Blade Geometry Explained: How Edge Shape Determines Cutting Performance
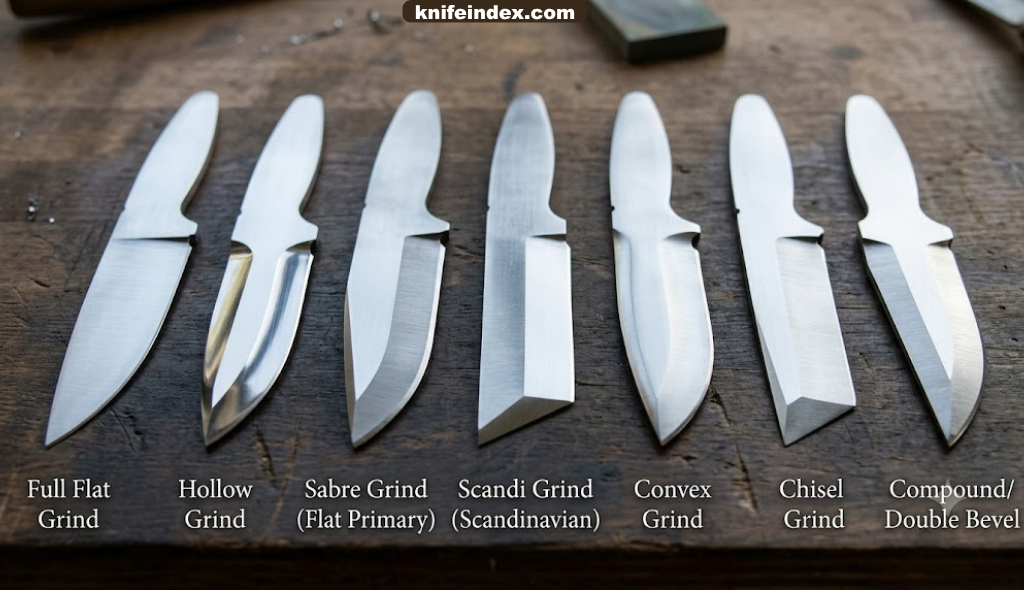
Different grinds and edge angles change how a blade cuts, slices, and holds an edge over time.
Pick up two knives that look almost identical from across the room, cut a tomato with each one, and you will immediately understand why blade geometry matters more than almost any other spec on the spec sheet. One glides through the skin without bruising the flesh. The other tears, drags, and mashes the fruit into a pulpy mess. Same steel type, same edge angle on paper, completely different feel in the hand. The difference almost always comes down to geometry — the physical shape of the blade from spine to edge, and how that shape is engineered to move through material.
Most buying guides obsess over steel type, hardness ratings, and brand reputation, and those things do matter. But steel only determines how long an edge lasts and how easily it can be sharpened. Geometry determines how the knife actually cuts the moment it touches whatever you’re slicing, chopping, or shaving. A mediocre steel with excellent geometry will often outperform a premium “super steel” ground poorly, especially for everyday tasks like food prep, box opening, or fine woodworking. This guide breaks blade geometry down piece by piece — grind type, edge angle, thickness behind the edge, distal taper, and how all of it combines to define a knife’s personality. By the end, you’ll be able to look at a blade’s cross-section and predict exactly how it will behave before you ever put it to use.
If you’re also comparing steels alongside geometry, it helps to read up on how different alloys behave once the shape is locked in — guides like 14C28N vs Nitro-V and D2 vs 8Cr13MoV pair well with the concepts covered here.
It’s worth noting that geometry isn’t a fixed, unchangeable property. Unlike steel type, which is locked in at manufacturing, geometry can be adjusted over the life of a knife through sharpening, re-profiling, and even light stock removal. This is part of why enthusiasts obsess over it: a knife you already own can often be transformed dramatically with nothing more than patience, the right stones, and an understanding of what shape you’re trying to achieve. A blade that felt clumsy and wedge-prone out of the box can become a genuinely excellent slicer once the geometry behind the edge is thinned out properly.
This guide is written for anyone trying to move past surface-level knife shopping — the kind driven purely by steel names and price tags — and toward a more informed understanding of why certain knives simply feel better in the hand. We’ll walk through every measurable dimension of a blade’s shape, explain how each one interacts with the others, and show how these principles play out differently across kitchen cutlery, everyday carry folders, and outdoor fixed blades. Along the way, we’ll reference real models and steels so you can see the theory applied to knives you may already own or be considering.
One last note before diving in: geometry terminology can vary slightly between manufacturers, sharpening enthusiasts, and knife makers, so don’t be surprised if you encounter slightly different phrasing across different sources. Some brands describe edge angle as an inclusive angle rather than per-side degrees, and some use “grind” loosely to refer to the entire blade shape rather than just the primary bevel. Wherever ambiguity exists in this guide, we’ll clarify exactly which measurement is being referenced so you can compare specs accurately across brands and models without confusion.
1. What Is Blade Geometry?
Blade geometry is the sum of every physical dimension that defines a blade’s cross-sectional shape: the grind, the edge angle, the thickness at the spine, the thickness directly behind the edge, the height of the grind, and the way all of these tapers change from the base of the blade to the tip. It is essentially the blade’s skeleton — invisible in a catalog photo, but the single biggest factor separating a knife that “cuts like butter” from one that fights you at every stroke.
Think of geometry as a wedge. Every knife, no matter how exotic the steel or how sharp the final edge, is fundamentally a wedge being forced through material. The angle and profile of that wedge determines how much resistance the material offers back. A steep, thick wedge pushes material apart forcefully and requires more effort but survives abuse. A thin, shallow wedge slices with almost no resistance but is more fragile and prone to rolling or chipping under lateral stress.
Manufacturers choose geometry based on intended use. A camp knife meant for batoning through wood needs a thick, robust profile that can absorb shock without snapping. A sushi knife meant for paper-thin slices of raw fish needs an extremely thin, acute geometry that produces almost zero friction. Neither is “better” in an absolute sense — they’re simply optimized for different jobs, which is why understanding geometry lets you match the right tool to the right task instead of relying on marketing claims alone.
| Geometry Trait | Thin / Acute | Thick / Robust |
|---|---|---|
| Cutting resistance | Low | High |
| Edge durability | Lower, prone to rolling | Higher, resists chipping |
| Best use case | Slicing, food prep, fine work | Chopping, prying, heavy-duty tasks |
| Sharpening ease | Easier, less metal to remove | Slower, more metal to remove |
Another way to understand geometry is to think about it as a compromise between two competing physical goals: minimizing resistance and maximizing durability. Every design decision a knife maker makes — grind type, edge angle, spine thickness — moves the blade somewhere along this spectrum. There’s no such thing as a geometry that maximizes both at once, because the physics simply won’t allow it. A blade thin enough to slice a ripe tomato without bruising it will always be more delicate than one built to split kindling, and a blade tough enough to pry open a paint can will never slice as effortlessly as a razor-thin kitchen knife.
This tradeoff is why experienced knife users often own several blades rather than searching for one “perfect” knife. A dedicated kitchen knife, a rugged fixed blade for outdoor work, and a moderate EDC folder for daily tasks each occupy a different point on the thin-to-thick spectrum, and each performs its intended job far better than a single compromise blade ever could. Recognizing this is often the first step toward becoming a more discerning knife buyer, since it reframes the question from “which knife is best” to “which geometry is best for what I’m actually doing.”
It’s also worth noting that geometry isn’t purely a manufacturing decision handed down from the factory — it’s something that can be discussed, measured, and even debated among knife owners the same way car enthusiasts debate suspension tuning or cyclists debate frame geometry. Online knife communities frequently share caliper measurements and cross-section photos precisely because these numbers tell a more complete story than steel type alone ever could. Learning to read and interpret these measurements yourself puts you in a much stronger position as a buyer, letting you evaluate new releases critically rather than taking marketing copy at face value.
2. Core Components of a Blade’s Shape
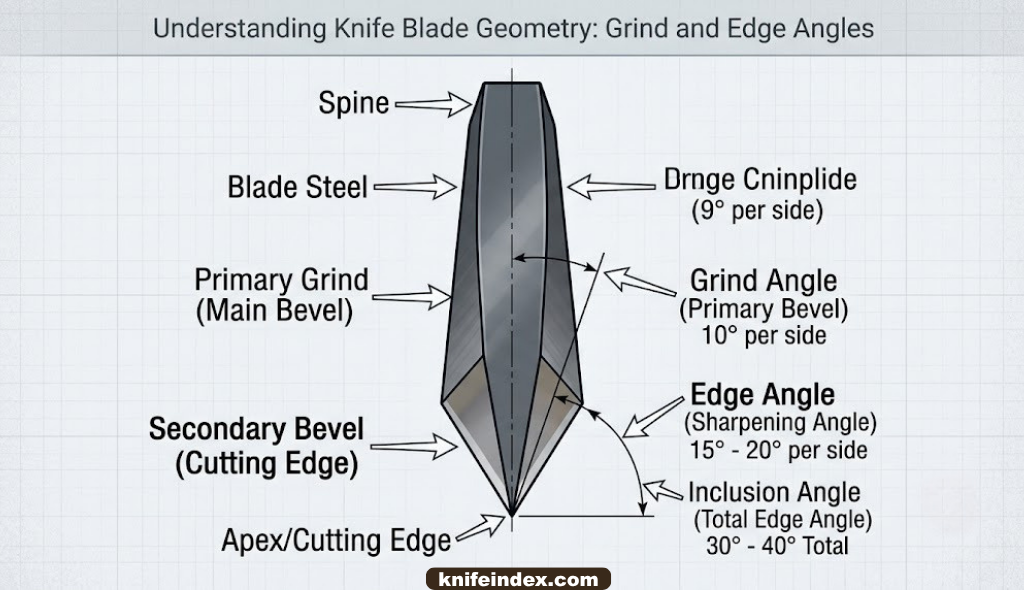
To talk about geometry accurately, it helps to know the vocabulary. Every blade cross-section is built from a handful of measurable parts, and small changes to any one of them ripple through the entire cutting experience.
Spine Thickness
This is the thickness of the blade stock before any grinding begins, measured at the back (spine) of the blade. A thin EDC folder might start around 0.09–0.12 inches, while a heavy-duty survival fixed blade can run 0.2 inches or more. Spine thickness sets the ceiling for how thin the edge can eventually become, and it heavily influences overall strength and flex resistance.
Grind Height
This is how far up the blade the grind extends, from the edge toward the spine. A full flat grind runs the bevel all the way to the spine, while a high hollow grind or a partial flat grind stops partway up, leaving a flat, unground section near the back for added strength.
Primary Bevel
The primary bevel is the large angled surface that tapers the blade stock down toward the edge. This is what most people picture when they think of a “grind” — flat, hollow, or convex.
Secondary Bevel (The Edge)
The secondary, or final, bevel is the narrow angled strip right at the very edge that is actually sharpened. This is the part touched during sharpening maintenance, and its angle is usually described in degrees per side.
Distal Taper
Distal taper refers to how the spine thickness itself decreases from the handle toward the tip on a fixed blade. A pronounced distal taper reduces tip weight, improves balance, and makes fine detail work easier — common on quality kitchen knives and traditional fixed blades.
Understanding these terms also helps when comparing specific models, such as the geometry differences discussed in the Benchmade Bugout review or the Morakniv Garberg review, where grind choice directly shapes each knife’s reputation.
Blade Height and Belly
Blade height, measured from the spine down to the edge at the widest point, affects how much surface area is available for the grind and how the knife handles rocking motions during cutting. A taller blade generally allows for a more gradual, efficient grind, while a shorter blade may need a steeper bevel angle to reach the same edge thickness. Belly, the curved section of the edge near the tip, influences how well a knife performs rocking cuts common in kitchen prep versus straight push cuts favored by many EDC and outdoor designs.
Edge Bevel Width
The width of the secondary bevel — how much of the blade face is taken up by the final sharpened angle — is a visual cue that tells you a lot about a knife’s edge angle without needing a protractor. A wide, clearly visible bevel usually indicates a more acute angle, since more material has been removed to reach the apex. A narrow, almost invisible bevel usually indicates a steeper, more obtuse angle, since less material needed to be removed. Learning to read bevel width at a glance is a useful skill for evaluating used knives or judging factory edges before a purchase.
Tip Geometry
Separate from the primary grind, tip shape is its own geometric consideration. Drop points, clip points, spear points, and tanto tips all distribute strength and precision differently. A fine, tapered tip excels at detail work and piercing but is more fragile under lateral stress, while a reinforced tanto-style tip sacrifices some precision for added strength during prying or piercing dense material.

Want to Feel Blade Geometry for Yourself?
A guided sharpening system lets you set and hold a precise edge angle so you can experience how geometry changes performance firsthand.
Check Price on Amazon3. Grind Types Explained
The “grind” is the shape of the primary bevel, and it is arguably the single most important geometric decision a knife maker makes. Each grind type trades cutting performance for durability in a different way.
Flat Grind
A flat grind tapers in a straight line from the spine (or partway down) to the edge. It’s a versatile, easy-to-manufacture grind that balances cutting ability with strength, making it common on both kitchen knives and outdoor fixed blades.
Hollow Grind
A hollow grind is concave, ground with a curved wheel that removes more material near the edge while leaving the spine thicker. This produces an extremely thin, low-friction edge that slices exceptionally well, but the thin edge is more prone to chipping on hard contact, which is why hollow grinds are popular on straight razors and slicing knives but less common on hard-use survival blades.
Convex Grind
A convex grind curves outward, gradually thickening as it approaches the spine without any flat sections. This shape reinforces the edge with extra material right behind it, giving convex-ground blades outstanding durability for chopping and batoning — a big reason axes and heavy choppers often use this profile, as seen in comparisons like Fiskars X27 vs Super Splitting Axe.
Sabre Grind
A sabre grind starts the primary bevel partway down the blade rather than at the spine, leaving a thick flat section near the top. This adds strength for prying and hard use while still allowing a reasonably efficient edge, a common compromise on tactical and outdoor folders.
Chisel Grind
A chisel grind is beveled on only one side, leaving the opposite face completely flat. It sharpens quickly and can achieve an extremely acute edge, but it pulls to one side when cutting, which is why it’s mostly reserved for specialty tools and some traditional Japanese blades rather than general-purpose knives.
| Grind | Cutting Ability | Edge Strength | Common On |
|---|---|---|---|
| Flat | High | Medium | Kitchen knives, fixed blades |
| Hollow | Very High | Low | Razors, slicers |
| Convex | Medium-High | Very High | Choppers, axes, hard-use knives |
| Sabre | Medium | High | Tactical folders, outdoor knives |
| Chisel | Very High (one direction) | Medium | Specialty and traditional blades |
Grind choice also shows up clearly when comparing forged construction methods, discussed further in Forged vs Stamped Knives, since forged blanks often allow more aggressive distal tapering paired with a chosen grind.
Full Flat Grind vs Partial Flat Grind
Within the flat grind family, there’s an important distinction between full flat grinds, which taper all the way from the spine to the edge, and partial (or high) flat grinds, which stop partway up the blade and leave a thicker, unground section near the spine. Full flat grinds tend to slice more efficiently since there’s less total material to push through, while partial flat grinds retain extra strength near the spine for tasks that involve more lateral stress, such as light prying or twisting cuts.
Scandi Grind
A Scandinavian, or Scandi, grind is a specific variant of the flat grind popular on bushcraft knives like those featured in the Morakniv Companion review. It uses a single, wide flat bevel with no secondary edge bevel at all, which makes it exceptionally easy to sharpen freehand by simply laying the bevel flat on a stone, while still offering solid slicing performance for wood carving and general bushcraft tasks.
Compound and Double Grinds
Some blades combine two grind types in a single profile — for example, a convex primary grind paired with a flat secondary bevel, or a hollow grind with a convex micro-bevel at the very edge. These compound grinds attempt to capture the slicing efficiency of one shape with the edge durability of another, though they’re more complex and costly to manufacture consistently.
4. Edge Angle and Bevel
Edge angle refers to the angle of the final sharpened bevel, typically measured in degrees per side (inclusive angle is double that number). A 15-degree-per-side edge is considered thin and acute; a 20 to 25-degree-per-side edge is thicker and more robust. This single number has an outsized effect on how a blade feels in use.
Thinner edge angles, generally in the 12 to 17 degree per side range, slice with dramatically less resistance and are favored on kitchen knives, especially Japanese-style blades built for push cuts and fine slicing, as explored in Single-Bevel vs Double-Bevel Knives. The tradeoff is that a thin edge is more vulnerable to rolling or micro-chipping if it contacts bone, a cutting board that’s too hard, or a twisting motion.
Thicker edge angles, typically 20 to 30 degrees per side, sacrifice some slicing efficiency in exchange for an edge that shrugs off harder use. This is why many EDC and outdoor knives, including the models discussed in the Spyderco Paramilitary 2 review, ship with edges closer to 20 degrees per side rather than razor-thin geometry.
Single Bevel vs Double Bevel
Most Western knives use a double (symmetrical) bevel, sharpened evenly on both sides, which cuts straight and is easier for most people to sharpen. Traditional Japanese knives often use a single bevel, sharpened almost entirely on one face, which produces an extremely thin edge ideal for precise, clean slices but requires specialized sharpening technique and tends to steer to one side during the cut.
Micro-Bevels and Edge Reinforcement
Many modern knives, including several covered in the Spyderco Tenacious review, use a tiny secondary micro-bevel applied at a slightly steeper angle than the primary edge. This adds a small amount of reinforcement right at the very apex without meaningfully sacrificing overall slicing performance, essentially getting the best of both a thin primary edge and a durable working apex. Micro-bevels are also a common trick during sharpening maintenance, since touching up just the micro-bevel is much faster than reprofiling the entire edge.
How Edge Angle Interacts With Material Hardness
The ideal edge angle isn’t just about the knife — it also depends on what you’re cutting. Soft materials like ripe produce or raw fish reward extremely thin edges with minimal resistance, while harder or more abrasive materials like cardboard, rope, or frozen food tend to dull thin edges quickly and benefit from a slightly more robust angle. This is one reason many all-purpose EDC knives split the difference around 18 to 20 degrees per side rather than optimizing purely for one task.
5. Blade Thickness and Distal Taper
Overall blade thickness — the spine measurement before any grinding — sets the outer limits of what geometry is even possible. A blade milled from thin stock can be ground into an extremely thin, agile edge, but it will never match the raw strength of a thicker blank, regardless of grind or heat treatment.
Distal taper compounds this by reducing thickness progressively from the handle toward the tip. A knife with strong distal taper feels lighter and more nimble despite having a robust spine near the grip, because most of the mass has been shaved away toward the point. This is especially valuable on kitchen knives, where tip control matters for detail work like trimming or scoring, and on fixed-blade hunting knives used for field dressing, a task covered in depth in the field dressing knife buyer’s guide.
Without distal taper, a blade can feel tip-heavy and clumsy even if the primary grind is excellent, which is a common complaint with cheaply stamped blades that are cut from uniform-thickness sheet steel rather than forged or precision-milled stock.
Why Stock Thickness Is a Starting Constraint, Not a Final Spec
It’s a common mistake to compare knives purely by their listed spine thickness, assuming a thinner spec sheet number automatically means a better-cutting knife. In reality, spine thickness only defines the raw material budget available to the grinder. A 0.15-inch thick blank ground into a full flat grind with a thin edge angle can out-cut a 0.10-inch thick blank that’s been given a stubby sabre grind with a thick, abrupt edge. The finished geometry matters far more than the starting stock number alone, which is why savvy buyers look past spec sheets toward actual grind photos or in-hand measurements whenever possible.
Balance Point and Handling
Distal taper also shifts a knife’s balance point back toward the handle, which affects how a blade feels during extended use. A well-tapered fixed blade, similar in concept to the tapering found in premium kitchen knives discussed in the understanding knife balance guide, reduces wrist fatigue during long prep sessions or extended fieldwork because less mass needs to be actively controlled at the tip with every motion.

Measure Your Own Blade Geometry
A digital angle gauge makes it easy to check edge angle and grind consistency on any knife in your collection.
Check Price on Amazon6. Thin Behind the Edge vs Thick Behind the Edge
“Thickness behind the edge” (often shortened to BTE) refers specifically to how thick the blade is measured a fraction of an inch above the actual cutting edge, before the final sharpened bevel begins. This measurement is one of the most reliable predictors of real-world cutting feel, often more telling than the sharpened edge angle alone.
A knife can be sharpened to a razor-fine edge angle and still cut poorly if the geometry directly behind that edge is thick, because the blade has to force material apart as soon as it passes the edge itself. This is sometimes called “edge geometry mismatch,” and it explains why two knives with identical edge angles can perform completely differently — one has a thin, efficient grind supporting the edge, and the other has a stubby, abrupt transition that creates a wedging effect deeper in the cut.
Enthusiasts who reprofile knives for kitchen use often thin the blade well behind the edge, not just the edge itself, to eliminate this wedging sensation — a process sometimes discussed alongside sharpening systems in the best knife sharpeners guide. For food prep especially, a thin-behind-the-edge blade glides through dense vegetables like squash or carrots with none of the cracking or splitting associated with thicker stock knives.
Thin Behind the Edge
Effortless slicing, less food sticking to the blade face, ideal for produce and proteins, lower cutting fatigue.
Thick Behind the Edge
Better lateral strength, resists twisting damage, more forgiving on cutting boards or bone contact, longer-lasting edge under abuse.
How to Estimate Thickness Behind the Edge Without Special Tools
You don’t necessarily need calipers to get a rough sense of a blade’s BTE. Holding the blade up to a light source and looking at how the secondary bevel catches the light can reveal how abrupt or gradual the transition is. A blade that shows a wide, gradually widening reflection has a thinner, more efficient transition, while a blade that shows a sudden, narrow glint right at the edge often has a thicker, more abrupt geometry behind it. For a more precise reading, inexpensive digital calipers can measure the thickness a millimeter or two above the edge, giving you an objective number to compare across different knives.
Why This Matters More for Kitchen Knives Than Any Other Category
Thickness behind the edge is most noticeable in kitchen tasks because food, unlike rope or cardboard, is often dense and moist enough to reveal wedging immediately. Cutting a carrot or a block of cheese with a thick-BTE knife often produces an audible cracking or splitting sound as the material is forced apart rather than sliced cleanly, while a thin-BTE knife passes through with a clean, quiet cut. This is a major reason enthusiast cooks frequently reprofile inexpensive kitchen knives, thinning the geometry well behind the edge rather than just touching up the sharpened bevel.
7. How Geometry Affects Cutting Performance
Cutting performance can be broken into a few distinct qualities, and geometry influences each one differently. Push-cutting performance — slicing straight down through an object — is dominated by edge angle and thickness behind the edge, since there’s minimal lateral force involved. Slicing performance, where the blade is drawn back and forth, benefits enormously from a thin grind and a slightly toothy or fine edge finish depending on the material.
Chopping performance depends more on blade mass, edge angle, and overall geometry robustness than on razor sharpness, which is why a convex-ground camp knife can out-chop a razor-sharp hollow-ground blade despite technically being less “sharp” by some measures. Piercing performance relies on tip geometry and the taper of the point rather than the primary grind at all, which is why drop-point and spear-point knives, discussed in guides like Benchmade 940 Osborne review, feel so different from tanto-style tips in piercing tasks.
Understanding which performance category matters most for your use case is the fastest way to shortcut the buying process. Someone who mostly opens boxes and cuts rope cares primarily about edge retention and moderate slicing ability. Someone prepping vegetables nightly cares intensely about thin-behind-the-edge geometry. Someone splitting kindling cares almost exclusively about chopping geometry and edge durability, a distinction explored in the Fiskars X7 vs X11 axe geometry comparison.
Friction and Food Release
Beyond raw cutting resistance, geometry also affects how much food or material sticks to the blade face during a cut, a quality sometimes called food release. Convex and hollow grinds tend to release food better than flat grinds, because their curved surfaces create less continuous contact area against sliced material. Some manufacturers add dimples or a Granton edge, a series of scalloped indentations along the blade face, specifically to reduce suction and improve release on flat-ground kitchen knives, a feature worth considering alongside the santoku and gyuto comparisons in the MAC vs Global Japanese knives comparison.
Lateral Strength and Twisting Resistance
Geometry also determines how well a blade resists lateral stress — sideways pressure applied during twisting cuts, prying motions, or accidental binds inside a cut. Thinner blades and more acute edge angles are more prone to rolling or even snapping under lateral stress, which is why thin Japanese-style kitchen knives are generally not recommended for tasks like twisting apart joints or prying open packaging, tasks better suited to thicker, more robust Western-style blades.
8. Geometry and Edge Retention
Edge retention is usually credited entirely to steel type and heat treatment, but geometry plays a substantial supporting role. A thinner edge angle dulls faster under the same use because there’s less metal supporting the apex — microscopic rolling and folding happen more easily on a delicate 12-degree edge than on a robust 22-degree edge, even with identical steel.
This is why premium steels like those compared in MagnaCut vs M390 or S35VN vs S45VN are often paired with slightly more conservative edge angles on hard-use knives — the steel’s toughness and wear resistance is being used to support a geometry that would otherwise be too fragile at a thinner angle. Conversely, softer or simpler steels can still hold a working edge surprisingly well if the geometry is generous enough to avoid rolling, which explains why budget steels like those in the 440 stainless breakdown can still perform respectably in real-world use.
In short: geometry determines how much stress the edge apex experiences during use, and steel determines how well that apex tolerates the stress. The two variables are inseparable when evaluating true cutting performance and longevity.
Edge Retention Testing and Its Limits
When you see edge retention comparisons online, such as those referenced in the Wusthof vs Zwilling vs Shun edge retention test, it’s worth remembering that most tests hold edge angle constant across the compared knives specifically to isolate steel performance. In real-world shopping, edge angle and steel vary simultaneously between models, which means published edge retention rankings for a given steel type don’t always translate directly to how long a specific knife will actually stay sharp in your hands. A thinner-edged knife in a “better” steel might still dull faster in practice than a thicker-edged knife in a lesser steel.
The Role of Heat Treatment
Heat treatment interacts with geometry as well, since a properly hardened edge can support a thinner geometry without excessive rolling, while an under-hardened edge will deform and lose its geometry quickly regardless of how well it was ground. This is one reason two knives using the exact same steel type can perform very differently in the field — the heat treatment, not just the alloy name on the spec sheet, determines how much stress the resulting edge can actually withstand at a given angle.

Maintain the Geometry You Choose
A quality whetstone kit helps you preserve the original edge angle instead of rounding it over with repeated sharpening.
Check Price on Amazon9. Geometry by Knife Type
Kitchen Knives
Kitchen knives generally favor thin, acute geometry for effortless slicing. Japanese gyutos and santokus, compared in depth in Nakiri vs Santoku, often use flat or slightly convex grinds with edge angles around 15 degrees per side, prioritizing food-release and slicing efficiency over abuse resistance. German-style chef’s knives, by contrast, often use a slightly thicker geometry around 20 degrees per side, trading a bit of slicing finesse for a more forgiving edge that tolerates rougher cutting board contact and heavier rock-chopping technique, a distinction covered further in the German steel vs Japanese steel comparison.
Everyday Carry Folders
EDC knives balance slicing ability with durability for varied tasks, typically landing on flat or high hollow grinds with edge angles in the 17 to 20 degree range, as seen across models like the CIVIVI Elementum review and CRKT Pilar review.
Outdoor and Survival Knives
Bushcraft and survival knives lean toward convex or sabre grinds with thicker stock, prioritizing durability for batoning and prying over pure slicing finesse, a philosophy reflected in the Morakniv Companion review and Ontario RAT-1 review.
Tactical and Self-Defense Knives
These often use sabre grinds with reinforced tips and moderately thick edges to survive high-stress use without chipping, prioritizing structural integrity over maximum cutting efficiency.
Hunting and Field Dressing Knives
Hunting knives occupy a unique middle ground, needing enough slicing efficiency for clean skinning cuts while retaining enough durability to handle joints and connective tissue without damage. Drop-point profiles with moderate flat or convex grinds, similar to those in the Ontario RAT-2 review, are popular for balancing these competing demands in the field.
Budget and Value-Oriented Knives
Value knives, including many discussed in the Dexter-Russell knives review, often rely on simple, easy-to-manufacture flat or sabre grinds paired with more conservative edge angles. This keeps production costs low while still delivering respectable performance, since manufacturing a consistent thin geometry at scale is considerably more expensive than producing a moderate, forgiving edge angle.
10. Steel vs Geometry: Which Matters More
This is one of the most debated questions among knife enthusiasts, and the honest answer is that they solve different problems. Geometry determines how a knife cuts on day one, out of the box, regardless of steel. Steel determines how long that cutting performance lasts and how much abuse the edge can survive before requiring maintenance.
A budget knife with excellent geometry, similar to models covered in the Kiwi Knives review, can genuinely outcut an expensive knife with mediocre geometry during the first few uses, even though the premium steel will eventually pull ahead in long-term edge retention. For buyers on a budget, prioritizing geometry over steel hype is usually the smarter move, since a well-ground blade in a modest steel is easy to touch up and will still perform admirably for daily tasks.
That said, once you’re comparing two knives with similarly good geometry, steel becomes the deciding factor for long-term value, which is why comparisons like CruWear vs 3V matter most for buyers who already understand what grind and edge angle they want.
A Practical Buying Framework
When evaluating a new knife, it helps to ask two separate questions rather than one combined judgment. First: does the geometry — grind type, edge angle, and thickness behind the edge — match the tasks I actually plan to use this knife for? Second: does the steel offer acceptable edge retention and corrosion resistance for how often I’m willing to maintain it? Treating these as two independent evaluations, rather than lumping everything into a single “is this a good knife” judgment, leads to far better purchasing decisions and fewer post-purchase regrets.
Diminishing Returns on Premium Steel
It’s also worth recognizing that steel improvements follow a curve of diminishing returns for most users. The jump from a basic stainless steel to a mid-tier steel like those in the VG-10 vs AUS-10 comparison is noticeable in daily use. The jump from a mid-tier steel to an ultra-premium “super steel,” however, often matters far less to the average user than simply having good geometry in the first place, since most people sharpen long before a super steel’s theoretical edge retention ceiling is ever reached.
11. Choosing the Right Geometry for Your Needs
Rather than chasing a single “best” geometry, match the blade shape to your actual use pattern. If most of your cutting involves food prep, prioritize a thin flat or convex grind with an acute edge angle around 15 degrees per side. If you carry a knife daily for mixed tasks like opening packages, cutting cord, and occasional food prep, a moderate flat or hollow grind around 17 to 20 degrees offers the best all-around balance, similar to the geometry found in the Spyderco Delica 4 review.
If your knife needs to survive genuine outdoor abuse — batoning, prying, contact with dirt and rock — favor a thicker sabre or convex grind with an edge angle closer to 20 to 25 degrees, prioritizing durability over slicing finesse. And if you’re buying a gentleman’s folder primarily for light tasks and presentation, geometry matters less than fit, finish, and materials, a topic covered in the best gentleman knives guide.
It also helps to physically compare blade cross-sections before buying whenever possible. Many manufacturers now publish edge angle specs, and enthusiast reviews frequently measure thickness behind the edge directly, giving you real data instead of guesswork.
A Simple Decision Checklist
- Primary use: Food prep, daily carry, or outdoor abuse? This decides your grind family.
- Edge angle preference: Prioritize acute angles (15° or less per side) for slicing-heavy tasks, and more obtuse angles (20°+ per side) for durability-heavy tasks.
- Maintenance willingness: Thinner geometries need more careful sharpening technique and more frequent touch-ups.
- Material contact risk: Knives that might contact bone, hard plastic, or dirt should lean toward thicker, more forgiving geometry.
Running through this checklist before comparing specific models — whether you’re looking at the CRKT Squid review or a full kitchen set — helps filter out knives that look appealing on paper but don’t actually match how you plan to use them day to day.
12. Maintaining and Re-Profiling Blade Geometry
Sharpening maintains an existing edge angle, while re-profiling changes it entirely, removing significantly more material to establish a new geometry. Most casual users should stick to maintaining the factory edge angle with a guided sharpening system or quality whetstone, since re-profiling a thick factory edge down to something thinner can take considerable time and steel removal.
Over years of repeated sharpening, edge angles can drift wider than intended if a sharpener isn’t consistent, gradually turning a once-thin blade into something thicker and less efficient — a slow form of unintentional re-profiling. Using a fixed-angle guide helps preserve the original geometry over the knife’s lifetime, and periodically checking thickness behind the edge with calipers can catch this drift before it becomes noticeable in daily cutting feel.
For blades that arrive from the factory with objectively poor geometry — thick, abrupt edges that wedge through food or material — a one-time re-profiling session can dramatically transform how the knife performs, often making a budget blade feel like a completely different tool, a transformation frequently discussed in maintenance guides like how to prevent rust on knives and related upkeep resources.
Signs Your Geometry Needs Attention
A few practical warning signs suggest a blade’s geometry may need re-profiling rather than a simple touch-up. If a knife requires noticeably more sharpening sessions than it used to just to restore a working edge, the angle may have drifted wider over years of inconsistent freehand sharpening. If the blade wedges or splits food rather than slicing cleanly, despite a genuinely sharp apex, the geometry behind the edge is likely too thick for the task. And if the edge rolls or micro-chips frequently during normal use, the current angle may be too acute for how the knife is actually being used, suggesting a slightly more robust angle would serve better.
Tools for Maintaining Consistent Geometry
Fixed-angle sharpening systems remove much of the guesswork from maintaining consistent geometry, holding the blade at a set angle throughout the sharpening stroke. Freehand sharpening on a whetstone offers more flexibility and is often preferred by experienced users, but it requires practice to maintain a consistent angle across repeated sharpening sessions. Whichever method you choose, periodically verifying your edge angle with a simple angle gauge helps ensure your maintenance routine is preserving the geometry you originally wanted, rather than slowly drifting it toward something thicker and less efficient over time.
Frequently Asked Questions
What exactly is blade geometry?
Blade geometry is the overall physical shape of a knife’s cross-section, including grind type, edge angle, spine thickness, thickness directly behind the edge, and distal taper. Together these dimensions determine how a blade behaves when cutting, entirely separate from steel type or hardness. Two knives made from the identical steel alloy can feel completely different in use if their geometry differs, which is why enthusiasts treat geometry as its own category worth studying independently.
Does blade geometry matter more than steel type?
For immediate cutting performance, geometry usually matters more, since it dictates how the blade behaves the moment it contacts material, before wear or dulling ever enters the equation. Steel matters more for how long that performance lasts and how the edge holds up over repeated use, contact with hard materials, and exposure to moisture. Neither variable can fully compensate for a serious weakness in the other, which is why the best knives get both right simultaneously.
What is “thin behind the edge” and why does it matter?
It refers to how thick the blade is measured just above the sharpened bevel, before the secondary edge angle even begins. A thinner measurement here reduces wedging resistance during a cut, which is why it often affects real-world slicing feel more than the sharpened edge angle alone. Two knives can share the exact same edge angle on paper and still feel completely different if one has been thinned out well behind the edge and the other hasn’t.
Which grind is best for kitchen knives?
Flat grinds and convex grinds are the most common choices for kitchen knives because they support thin, acute edges suited to slicing food cleanly without excessive resistance. Full flat grinds paired with a moderate distal taper are especially popular on Japanese-style gyutos and santokus, since they minimize friction while still offering enough structure to survive daily kitchen use.
Which grind is toughest for outdoor use?
Convex grinds are generally considered the most durable for chopping and batoning tasks, since the rounded profile reinforces the edge with extra supporting material rather than tapering to a thin flat bevel. This is why axes, hatchets, and heavy-duty bushcraft knives frequently favor convex geometry over flat or hollow alternatives, even though convex grinds are somewhat harder to sharpen freehand.
What edge angle should I choose for an everyday carry knife?
Most EDC knives perform well with an edge angle between 17 and 20 degrees per side, balancing slicing ability with enough durability for mixed daily tasks like opening mail, cutting cord, or breaking down cardboard. Going thinner improves slicing but increases the risk of rolling on harder incidental contact, while going thicker sacrifices some everyday cutting feel in exchange for added forgiveness.
Can a thin edge angle be too fragile?
Yes. Very acute edge angles, especially under 15 degrees per side, can roll or chip if used on hard materials, twisted during a cut, or used for tasks beyond food prep and fine slicing. This is why thin, acute edges are usually reserved for kitchen knives and dedicated slicers rather than knives expected to handle rougher outdoor or utility tasks.
What is distal taper and why does it matter?
Distal taper is the gradual reduction in blade thickness from the handle toward the tip, independent of the primary grind. It improves balance and reduces tip-heaviness, which is especially valuable for detail work and precision cutting, and it also shifts a knife’s overall balance point back toward the handle for more comfortable extended use.
Should I re-profile a factory edge?
Only if the factory geometry is noticeably thick or wedges through material during normal use. Re-profiling removes significant metal and can take considerable time by hand, so it’s usually treated as a one-time correction rather than routine maintenance. Once re-profiled to your preferred angle, ordinary sharpening sessions simply maintain that new geometry going forward.
How does geometry affect edge retention?
Thinner edges dull faster under identical use because there’s less supporting metal at the apex to resist rolling and micro-chipping, even when paired with premium steel. Thicker edges tend to hold a technically usable edge longer under heavy use, though they may never cut quite as cleanly as a thinner geometry did when freshly sharpened.
What’s the difference between single-bevel and double-bevel geometry?
Double-bevel edges are sharpened symmetrically on both sides and cut straight through material, making them easier for most people to maintain. Single-bevel edges are ground almost entirely on one face, producing an extremely thin edge that excels at clean slicing but tends to steer slightly during the cut and requires more specialized sharpening technique to maintain properly.
Can I judge blade geometry just by looking at a knife?
You can estimate it reasonably well by examining the grind shape, the visible width of the secondary bevel, and how the blade catches light along the edge. For precise thickness-behind-the-edge measurements, however, digital calipers or a dedicated angle gauge will give you an objective number rather than a visual estimate.
Why do some knives feel sharp but still cut poorly?
A blade can have a genuinely sharp, fine apex and still cut poorly if the geometry immediately behind that edge is too thick, creating a wedging effect deeper into the material. This is why sharpness and geometry are two separate qualities — a knife needs both a fine apex and efficient supporting geometry to cut cleanly through dense or resistant material.
13. Common Geometry Mistakes to Avoid
Even experienced knife owners fall into a handful of predictable traps when it comes to geometry. The most common is chasing edge angle numbers in isolation, assuming a thinner angle is always objectively better, without accounting for thickness behind the edge or how the knife will actually be used. A razor-thin edge angle on a blade with poor supporting geometry, or on a knife destined for rough outdoor tasks, will disappoint no matter how impressive the number looks on paper.
A second common mistake is over-sharpening past the point of benefit, gradually widening the edge angle with each freehand session until a once-thin, efficient blade becomes noticeably thicker and less capable, without the owner ever noticing the slow drift. Using a fixed-angle guide periodically, even if you prefer freehand sharpening most of the time, is a simple way to catch and correct this drift before it becomes significant.
A third mistake is ignoring geometry entirely when comparing knives, focusing purely on steel type and brand reputation. This leads buyers toward knives that look impressive on a spec sheet but underperform in actual daily use, when a less hyped model with better-executed geometry, such as those detailed in the Mosfiata chef knife review, would have served them far better for the money.
Finally, many buyers assume that a thicker, more robust blade is automatically a “higher quality” or more premium knife, when in reality thickness alone says nothing about quality — it only indicates a design choice optimized for durability over slicing efficiency. A thin, well-executed kitchen knife is not a lesser product than a thick outdoor blade; it’s simply engineered for a different job entirely.
A related mistake worth flagging is judging geometry from photographs alone, without accounting for lighting and camera angle, both of which can make a grind look thinner or more dramatic than it actually is in hand. Whenever possible, cross-reference marketing photos with independent reviews, forum measurements, or in-person handling before drawing firm conclusions about how a blade’s geometry will actually perform, especially for higher-priced purchases where getting it wrong is costlier to correct later.

Compare Geometry Across Your Collection
A set of digital calipers makes it simple to measure thickness behind the edge and spine thickness on any knife you own.
Check Price on AmazonFinal Thoughts on Blade Geometry
Blade geometry is the quiet variable behind every great cutting experience and every disappointing one. Steel type gets the marketing spotlight, but the shape of the blade — its grind, edge angle, thickness behind the edge, and distal taper — determines how a knife actually feels the moment it meets material. Once you understand these fundamentals, you can evaluate any knife on its own merits instead of relying on steel names and brand reputation alone, and you can start asking sharper, more useful questions before you buy: what grind is this, how thick is it behind the edge, and does that match what I’ll actually be cutting.
Whether you’re shopping for a new kitchen knife, an everyday carry folder, or a rugged outdoor blade, matching geometry to your actual use case will do more for your cutting experience than almost any other spec, including steel type. Two knives with wildly different price tags can feel nearly identical in the hand if their geometry is similar, while two knives at the same price point can feel worlds apart if one was ground thoughtfully and the other wasn’t. Take the time to look past the marketing and examine the shape of the blade itself, and you’ll make better knife decisions for the rest of your life.
If you’re ready to put this knowledge into practice, a guided sharpening system is one of the best ways to explore and maintain the geometry that suits you best, letting you experiment with different edge angles and directly feel how each one changes the way a blade performs.
Shop Sharpening Systems on Amazon