Knife Patina Explained: What It Is and How to Develop It
A complete guide to understanding, forcing, and maintaining the natural oxide layer that protects carbon steel blades.
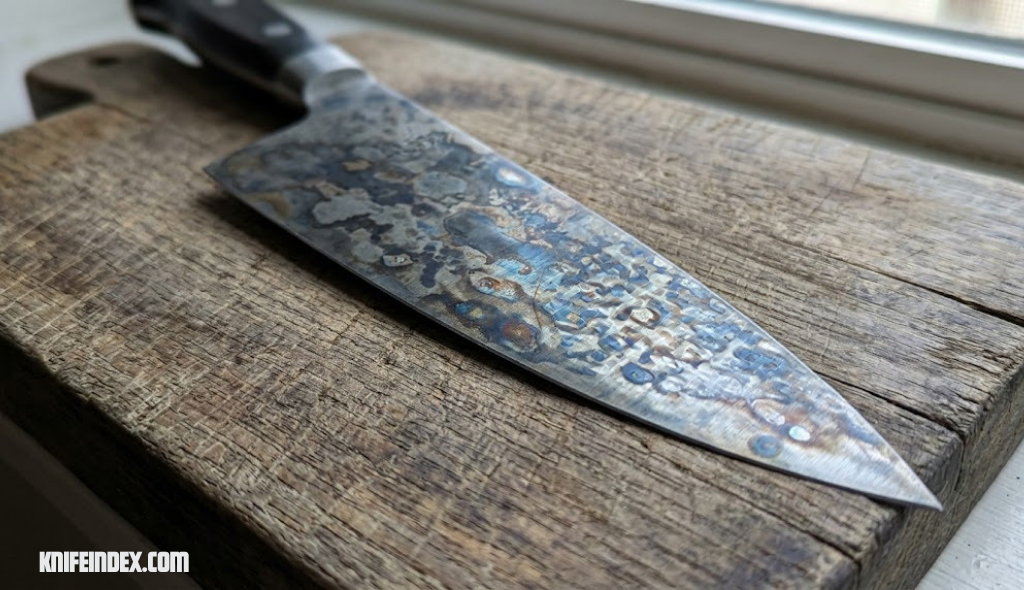
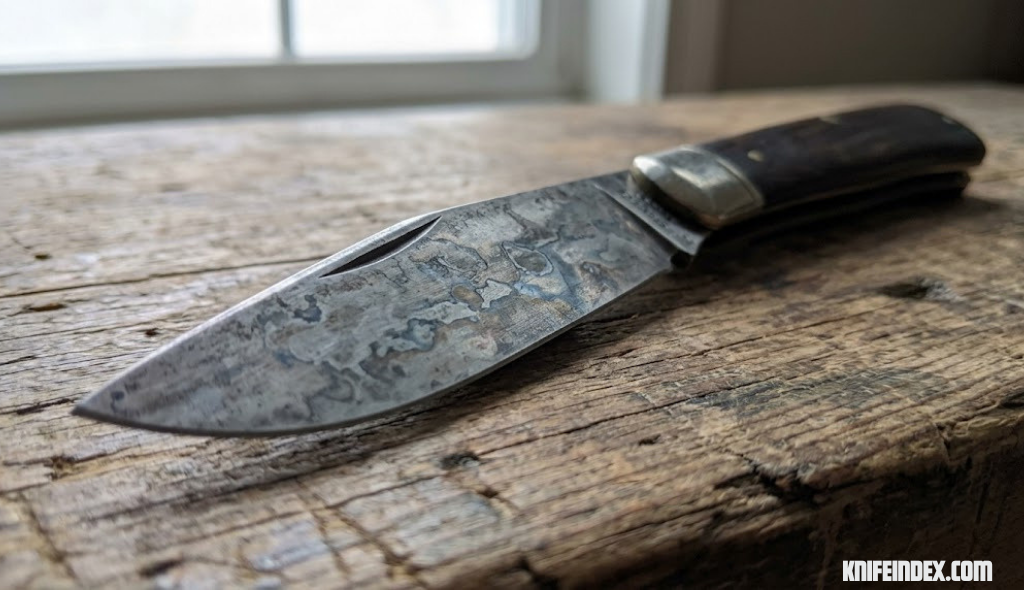
A patina like this isn’t damage — it’s a self-forming barrier that carbon steel grows to protect itself.
What Is Knife Patina?
If you’ve spent any time around carbon steel pocket knives or kitchen blades, you’ve probably noticed that older knives rarely look shiny and silver the way they did in the box. Instead, the steel often takes on a mottled gray, blue-black, brown, or even rainbow-tinted surface. That coloration is called patina, and it’s one of the most misunderstood characteristics of carbon steel cutlery.
Patina is a thin layer of iron oxide that forms on the surface of high-carbon steel when it reacts with air, moisture, and the acids or compounds it comes into contact with during normal use. Unlike rust, which eats into the metal and weakens the blade, patina is a stable, adherent, and largely protective layer. Many knife enthusiasts consider it a badge of honor — visual proof that a blade has been used, fed, and cared for.
Understanding patina matters if you own or are considering a carbon steel knife, whether it’s a rugged bushcraft fixed blade like the Ontario RAT 1, a Scandinavian classic like the Morakniv Companion, or a high-carbon kitchen knife used for everyday food prep. Knowing what patina is — and how to control it — helps you get the most performance and longevity out of your blade.
The word “patina” itself comes from the Latin word for a shallow dish, and over centuries the term evolved to describe the green film that forms on aged copper and bronze, then the darkened surface of old wood furniture, and eventually the oxide layers on iron and steel tools. In the knife world, patina has been deliberately cultivated for hundreds of years. Japanese swordsmiths understood that certain clay and quenching techniques produced differential hardening lines called hamon, which are essentially controlled patina zones. European cutlers in the 18th and 19th centuries knew that their high-carbon blades would take on color with use, and they treated this as a mark of quality rather than a defect.
Today, the knife community has developed an entire vocabulary around patina: “forced patina,” “natural patina,” “mustard patina,” “vinegar patina,” “coffee patina,” “lemon patina,” “apple patina,” and even “rainbow patina.” Each term describes a slightly different method or visual result, but all refer back to the same fundamental chemistry — controlled, beneficial oxidation that forms a protective skin over reactive steel. Whether you’re a collector who wants to preserve a blade’s pristine appearance or a user who embraces the tool’s evolving character, understanding patina is essential knowledge for any serious knife owner.
Want to try a patina-friendly carbon steel blade?
See current pricing and availability on Amazon.
Check Price on AmazonPatina vs. Rust: Key Differences
The single biggest point of confusion for new carbon steel owners is telling patina apart from rust. They can look similar at a glance, but they behave completely differently, and mixing them up can lead to either needless panic or, worse, ignoring active corrosion.
| Characteristic | Patina | Rust |
|---|---|---|
| Chemical composition | Mostly stable iron oxides (magnetite-like layer) | Hydrated iron oxide (Fe₂O₃·H₂O), unstable |
| Texture | Smooth, tightly bonded to the surface | Flaky, pitted, or powdery |
| Color | Gray, blue, brown, straw, sometimes rainbow | Orange-red or reddish-brown |
| Effect on steel | Protective; slows further oxidation | Destructive; continues eating into metal |
| Removability | Can be removed but blade is unharmed underneath | Leaves pitting even after removal |
| Formation speed | Gradual, or forced in minutes with acids | Can form quickly in humid or salty conditions |
In short: patina sits on top of the steel and protects it, while rust actively consumes the steel underneath. A well-developed patina layer actually makes a blade more resistant to rust, not less, because it blocks oxygen and moisture from reaching bare metal.
To understand why this difference matters so much, it helps to visualize what’s happening at the molecular level. Rust forms when iron reacts with oxygen in the presence of water to create hydrated iron oxide, a compound that takes up more physical space than the original iron atoms. This expansion is what causes rust to flake, crack, and expose fresh metal underneath — a destructive cycle that can eventually eat entirely through a blade if left unchecked. Patina, by contrast, forms in a low-moisture, mildly acidic environment that produces a denser, more stable oxide. This layer doesn’t expand as it forms, so it stays tightly bonded to the surface beneath it.
This distinction is also why bluing — the controlled rusting process used on firearms — produces a protective finish. Hot bluing and cold bluing both create a form of controlled rust (black iron oxide or magnetite) that is then stabilized with oil. The process intentionally converts the surface to a form of rust that won’t spread, which is conceptually identical to what a good patina does for a knife blade. Many knifemakers and gun enthusiasts draw parallels between firearm bluing and knife patina, and the underlying electrochemistry is remarkably similar.
Why Carbon Steel Patinas (The Chemistry)
Carbon steel is an alloy of iron and carbon with little to no chromium. Chromium is the element responsible for the “stainless” property in stainless steels — it forms an invisible, self-healing layer of chromium oxide that shields the metal from corrosion. Carbon steel lacks enough chromium to do this, so its iron content is left exposed to react with the environment.
When iron is exposed to oxygen and moisture, it oxidizes. Left uncontrolled, this reaction produces rust. But when the oxidation is controlled and encouraged in a mild, low-oxygen, acidic environment, the iron instead forms a tightly bonded layer of black or gray iron oxide (similar to what happens during bluing or forging). This layer occupies the surface, effectively “using up” the reactive iron atoms at the very top of the steel and leaving a barrier that slows down further oxidation.
This is why chefs who use high-carbon Japanese and Western kitchen knives, and outdoorsmen who carry blades like the ESEE JG3 in 1095 steel, often deliberately encourage a patina rather than fight it. The chemistry works in the user’s favor when it’s guided correctly.
Delving deeper into the chemistry, the patina formation process on carbon steel is primarily an oxidation-reduction reaction where iron atoms at the surface lose electrons to oxygen molecules, forming iron oxide. The specific type of iron oxide that forms depends on the conditions. In a neutral or slightly alkaline environment with abundant oxygen, you get red rust (Fe₂O₃·nH₂O). In a mildly acidic environment with limited oxygen, you get black iron oxide or magnetite (Fe₃O₄), which is the desirable patina compound. This is exactly why vinegar, mustard, and fruit acids work so well for forcing patina — they create that slightly acidic, oxygen-depleted microenvironment right at the steel surface.
The role of carbon content in the steel is also worth understanding. Higher carbon steels tend to patina more readily and with more dramatic color variation than lower carbon steels. This is because the iron carbide particles distributed throughout the steel matrix create micro-galvanic cells — tiny electrochemical batteries where the iron carbide acts as a cathode and the surrounding iron acts as an anode. These microscopic voltage differences accelerate localized oxidation, which is why high-carbon steels like 1095 or W2 produce such rich, varied patina patterns compared to mild steel, which tends toward a more uniform gray.
Interestingly, the same chemistry that makes carbon steel vulnerable to rust also makes it easier to sharpen to a screaming edge. The absence of chromium carbides — which are very hard but also somewhat brittle — means the steel matrix in high-carbon blades is more uniform and can take a finer, more acute edge. This is the great tradeoff of carbon steel: you give up stain resistance but gain sharpening response, and patina is the way smart users manage that tradeoff.
Which Steels Patina — and Which Don’t
Not every knife will develop a patina. Whether a blade can patina depends almost entirely on its chromium content and overall alloy composition.
| Steel Type | Patinas? | Notes |
|---|---|---|
| 1095, 1084, 1075 (plain carbon) | Yes, readily | Classic patina steels, used in many bushcraft and EDC fixed blades |
| O1, W2 tool steels | Yes, readily | Popular in custom and forged knives |
| 52100 | Yes | Common in premium fixed blades; patinas beautifully |
| D2 | Semi-stainless, patinas slowly | See our D2 vs 8Cr13MoV comparison for chromium context |
| 420HC, 8Cr13MoV | Rarely, very slowly | Higher chromium content resists staining |
| S30V, S35VN, S45VN, M390, MagnaCut | No | True stainless steels; see S35VN vs S45VN and MagnaCut vs M390 |
| 14C28N, Nitro-V | No, highly stain-resistant | Compare in our 14C28N vs Nitro-V breakdown |
| VG-10, AUS-10 | No | See VG-10 vs AUS-10 |
| CruWear, CPM 3V | Very slight patina possible | Semi-stainless tool steels; see CruWear vs 3V |
If you’re shopping specifically for a knife you plan to patina, plain high-carbon steels like 1095 or 52100 are your best bet. If you already own a knife and aren’t sure what steel it uses, check the manufacturer specs — for example, the Morakniv Garberg is offered in both a patina-prone carbon steel version and a stainless version, so it’s a great case study in the difference.
A special mention should be made of D2 steel, which occupies a fascinating middle ground in the patina world. D2 is technically classified as a “semi-stainless” tool steel because it contains around 11-12% chromium — just shy of the 13% threshold that most metallurgists consider the minimum for true stainless classification. In practice, D2 will develop a patina, but it takes significantly longer than 1095 or O1. Expect weeks or months of regular use rather than days. The patina on D2 also tends toward a more uniform gray rather than the dramatic multicolored patterns you see on simpler carbon steels. Many D2 owners report that their blades develop a subtle, almost stonewashed appearance over time rather than a bold patina statement.
It’s also worth noting that within the same steel type, different heat treatments can influence patina formation. A blade heat-treated to a higher hardness with a finer grain structure may patina slightly more slowly than the same steel at a lower hardness, simply because the tighter grain structure presents fewer reactive sites. Similarly, surface finish matters enormously. A mirror-polished blade will resist patina formation more than a satin or bead-blasted finish because the smoother surface has less total surface area exposed to reactants. This is why many custom knifemakers who work with carbon steel deliberately leave a hand-rubbed satin finish rather than a full mirror polish — it helps the patina take hold more evenly.
Benefits of a Developed Patina
Advantages
- Adds a layer of corrosion resistance without a factory coating
- Reduces the metallic “off” taste some foods pick up from bare carbon steel
- Gives the blade a unique, non-reflective, low-glare finish
- Can be shaped and controlled to create custom patterns or etches
- Costs nothing — no coatings, sprays, or trips to a gunsmith required
- Often improves food release slightly on kitchen blades
Trade-offs
- Looks less “clean” than polished stainless to some users
- Still requires drying and light oiling to prevent rust underneath
- Uneven patinas can look blotchy if not developed carefully
- Not a substitute for proper rust prevention habits
Beyond the basic advantages listed above, there are several nuanced benefits that experienced carbon steel users come to appreciate over time. First, a patina acts as a visual usage log — darker areas near the edge show where the knife has done the most cutting, while lighter areas near the spine indicate less contact. This can actually help you assess your cutting technique and see whether you’re using the full edge evenly. Some chefs deliberately read their patina patterns to identify whether they’re favoring a particular section of the blade.
Second, a patina dramatically reduces glare. For hunters, fishermen, and military users, a shiny blade can be a real liability — it can spook game, catch the eye of a fish, or in tactical situations, reveal a position. A well-developed patina in gray, blue, or black tones brings the blade’s reflectivity down to nearly zero, functioning much like a purpose-applied matte finish but with no additional weight, cost, or application time.
Third, there’s an aesthetic dimension that shouldn’t be dismissed. A knife with a beautifully developed patina tells a story in a way a pristine stainless blade never can. Each stain line, color shift, and gradient is a record of meals prepared, fireside tasks completed, and miles traveled. This character-rich appearance is a significant part of why carbon steel has such a devoted following even in an era when stainless steels have largely closed the performance gap.
Drawbacks and Common Concerns
Some new owners worry that a patina means their knife is “dirty” or damaged. This is almost always a misconception, but there are legitimate concerns worth knowing about. First, a patina is not indestructible — it can be scratched or worn away by aggressive sharpening, steel wool, or abrasive cleaning pads, exposing bright metal underneath that will need to re-patina. Second, in humid or salty environments, even a patinated blade can still surface-rust if left wet, so the patina reduces risk but doesn’t eliminate the need for basic care, similar to what’s outlined in our guide on how to get rust off a knife.
If you use a knife for food prep professionally or serve others, be aware that some people find the appearance of a patina unappealing on a plate, even though it’s completely food-safe. In commercial kitchens, this is worth considering before committing to a fully forced patina on a primary chef’s knife.
Another less-discussed drawback is that a heavy patina can slightly increase friction when cutting through certain materials. The microscopically textured oxide layer has a higher coefficient of friction than polished bare steel, which can make a noticeable difference when slicing through thick, dense materials like cardboard or leather. This effect is subtle and usually only noticeable in side-by-side comparisons, but for users who prioritize the absolute smoothest cutting experience, a polished stainless blade may feel slicker through material than a heavily patinated carbon blade.
There’s also the question of resale value. Among collectors and enthusiasts, a natural, well-developed patina generally increases a carbon steel knife’s appeal — it shows the blade has been used and cared for properly. But if you ever plan to sell your knife to a more general audience, be aware that some buyers will see any discoloration as a defect, no matter how many times you explain the difference between patina and rust. If resale value matters to you, it might be wise to keep your patina light and even, or to photograph and document the blade’s condition carefully to show prospective buyers that what they’re seeing is intentional and protective, not neglectful.
How Patina Forms Naturally
Left alone, carbon steel will patina simply through ordinary use. Cutting acidic fruits and vegetables — tomatoes, onions, citrus, apples — exposes the blade to mild acids that speed oxidation. Humidity in the air, oils and salts from your hands, and even the proteins in raw meat all contribute over weeks and months of regular use.
Natural patina tends to build up unevenly at first: darker near the edge where cutting contact is highest, lighter toward the spine. Over time, with consistent use and proper drying after each session, it evens out into a uniform gray-to-blue-black finish. This is the traditional way patina has formed on working knives, from old farm knives to modern bushcraft blades like the Ontario RAT 2.
The timeline for natural patina development varies widely depending on several factors: the specific steel composition, the ambient humidity where you live and work, how often you use the knife, what you cut, and how thoroughly you dry the blade after each use. In a humid coastal environment where a carbon steel kitchen knife sees daily use cutting tomatoes, citrus, and onions, visible patina can begin within two to three days, with a full even coat developing in two to four weeks. In a dry desert climate with occasional weekend use cutting mostly dry materials like rope and cardboard, it could take three to six months for anything beyond faint discoloration to appear.
The downside of natural patina is patience — it can take anywhere from a few weeks of daily use to several months of occasional use to develop a full, even coat. That’s why many owners choose to speed the process along with a forced method, covered next. But there’s a compelling argument for letting nature take its course: a naturally developed patina tends to be more even, more durable, and more tightly bonded to the steel than a forced patina, because it forms incrementally under the same conditions the blade will face in ongoing use. Forced patina is faster, but natural patina is often more robust.
For those who want to accelerate natural patina without going full chemical warfare, there’s a middle path: deliberately use the knife on patina-promoting foods during its first few weeks. Slice up a couple of apples and let the juice sit on the blade for five minutes before rinsing. Cut some hot cooked beef or pork — the combination of heat, moisture, and proteins seems to accelerate patina noticeably. Prep a batch of salsa with lots of tomatoes and lime juice, and let the blade rest between cuts. These small intentional acts can compress the natural patina timeline from months to weeks while still producing that organic, lived-in look that forced methods sometimes lack.
How to Force a Patina (Step-by-Step Methods)
Forcing a patina means deliberately exposing clean, bare carbon steel to a mild acid so the oxide layer forms quickly and evenly, rather than waiting for random use to do it over time. Below are the most reliable methods, each broken into clear steps with a visual diagram.
Method 1: Mustard Patina (Fast and Even)
Step 1 — Clean the blade. Degrease the blade fully with soap, water, and rubbing alcohol so no oils interfere with the reaction.
Step 2 — Apply yellow mustard. Coat the entire blade in a thin, even layer of plain yellow mustard, avoiding the handle and any exposed tang bolsters.
Step 3 — Wait and monitor. Let the mustard sit for 20–60 minutes. Check every 15 minutes; longer time equals darker, more even patina.
Step 4 — Rinse, neutralize, and dry. Rinse thoroughly under running water, wipe dry, and apply a very light coat of mineral oil or knife-specific oil to seal the new patina.
Method 2: Vinegar Soak (Deep, Dark Patina)
Step 5 — Submerge in diluted vinegar. Mix equal parts white vinegar and water in a container tall enough to submerge the blade. Suspend the blade so it doesn’t touch the container walls.
Step 6 — Check every 10 minutes. Pull the blade out periodically to check color progress; total soak time typically ranges from 20 minutes to 2 hours depending on desired darkness.
The vinegar method deserves special attention because it’s the most common forced patina technique, and small variations in the process can produce dramatically different results. Distilled white vinegar at 5% acidity is the standard choice, but apple cider vinegar produces a slightly warmer, brown-tinted patina, while rice vinegar yields a lighter, more translucent gray. The dilution ratio matters enormously: straight vinegar can etch the surface and leave a rough, matte finish, while a 1:1 dilution gives a smooth, dark patina. For a lighter, more gradual effect, some users go as dilute as 1:4 vinegar to water.
Temperature also plays a role. Warm vinegar (heated gently to around 100-110°F, not boiling) reacts faster and can produce a deeper patina in less time. Cold vinegar straight from the refrigerator will work much more slowly. If you’re aiming for a very dark, almost black patina, warm vinegar and longer soak times (up to 4 hours with periodic checking) will get you there, but be aware that extended exposure can start to etch the surface microscopically, which may affect cutting performance slightly until the blade is resharpened.
Method 3: Coffee or Fruit-Peel Patina (Mild, Natural Tones)
Step 7 — Wrap the blade in fruit peel or soak in strong coffee. Citrus peels, apple slices, or a cup of concentrated black coffee all produce a lighter, warmer patina than mustard or vinegar.
The coffee patina method has developed something of a cult following in recent years, and for good reason. Strong instant coffee dissolved in just enough hot water to make a thick paste creates a patina with warm brown and bronze tones that look distinctly different from the cool grays and blues of vinegar or mustard. Many users report that coffee patinas look more “organic” and natural than other forced methods, blending more seamlessly with subsequent natural patina development.
Fruit-based methods are perhaps the most traditional of all forced patina techniques. Before modern chemistry gave us standardized vinegar and prepared mustard, people noticed that their carbon steel knives would darken after cutting certain fruits. Wrapping a blade in apple peels overnight, or repeatedly slicing lemons and letting the juice sit, were the original “forced” methods. These techniques produce the most subtle results — often just a slight darkening that takes multiple sessions to build up — but they’re also the most foolproof, since it’s nearly impossible to overdo a fruit patina.

Seal your patina with food-safe mineral oil
A light coat protects the new oxide layer and keeps the blade food-safe.
Check Price on AmazonMethod 4: Etching a Pattern Into the Patina
Step 8 — Mask off a design. Use painter’s tape to mask a logo, name, or pattern before applying vinegar or mustard, leaving only exposed steel to darken.
Step 9 — Apply acid, then remove tape. Once the exposed sections darken to your liking, rinse, dry, and peel the tape to reveal a two-tone contrast pattern.
Whichever method you choose, always finish with a light coat of oil, and never use these acids on stainless blades like the Spyderco Paramilitary 2 or Benchmade Bugout — high-chromium steels simply won’t react the same way and there’s no benefit to trying.
Advanced Forced Patina Patterns and Techniques
Once you’ve mastered the basic forced patina methods, there’s a whole world of creative pattern-making to explore. The knife community has developed techniques ranging from simple stripe patterns to elaborate camouflage and galaxy-style finishes, all using nothing more than household acids and some creativity with application methods.
Mustard Splatter and Dapple Patterns
Instead of spreading mustard evenly, try flicking small droplets onto the blade using a toothbrush or the tip of a folded paper towel. This creates a dappled, speckled pattern that looks remarkably like natural stone or the surface of an old hammer-forged tool. The key is to vary the droplet sizes — some tiny specks, some larger blobs — and to let them sit for different lengths of time before rinsing. You can even do multiple rounds: apply small droplets, let sit 20 minutes, rinse, then apply larger blobs in different areas and let those sit for another 30 minutes. The overlapping exposure times create depth and complexity that a single application can’t match.
Striped and Geometric Patterns
Using thin strips of painter’s tape or electrical tape, you can create crisp horizontal, vertical, or diagonal stripes. Apply the tape in your desired pattern, then coat the exposed steel with mustard or vinegar paste. The taped areas will remain bright while the exposed areas darken. For a more organic look, tear the tape edges rather than cutting them clean — this creates a softer transition between patinated and unpatinated zones. Some users create elaborate geometric designs by layering tape patterns over multiple patina sessions, building up three or even four distinct tone levels on a single blade.
The “Galaxy” or “Nebula” Patina
This technique produces a swirling, cosmic-looking pattern with multiple colors including blues, purples, and golds alongside the standard grays and blacks. The method involves heating the blade slightly (warm to the touch but not hot enough to affect temper — around 150°F maximum), then applying a paste made from mustard powder mixed with vinegar and a small amount of salt. The warm steel accelerates the reaction unevenly, and the salt creates localized galvanic effects that pull surprising colors out of the steel. This is an advanced technique that requires practice and produces somewhat unpredictable results, but the finished product can be stunning.
Layered Patina: Building Depth
Perhaps the most sophisticated approach is the layered patina, where you build up depth and complexity through multiple controlled sessions. Start with a light overall vinegar soak to establish a base gray tone. Then do a mustard application in selected areas to add darker blotches. Finally, use fruit juice or coffee on specific sections to introduce warmer brown tones. Between each layer, lightly oil the blade and let it rest for 24 hours to allow the oxides to fully stabilize. The result is a patina with visible depth and multiple color dimensions that looks like it developed naturally over years of hard use.
Patina vs. Coatings: Blued, Parkerized, Cerakote
Patina is often compared to factory or aftermarket coatings, but they’re not the same thing. Bluing and Parkerizing are controlled industrial processes that create a similar protective oxide or phosphate layer, but under tightly regulated heat and chemical conditions for consistent results. Cerakote and similar ceramic coatings, by contrast, are external paints bonded to the surface rather than a reaction of the steel itself.
| Finish | How It Forms | Durability | Repairable by User? |
|---|---|---|---|
| Patina | Natural or forced oxidation reaction | Moderate; re-forms if scratched | Yes, easily at home |
| Bluing | Controlled heat/chemical oxidation | Moderate to high | Difficult without specialized supplies |
| Parkerizing | Phosphate conversion coating | High | No, requires re-dipping |
| Cerakote | Sprayed ceramic-polymer coating | Very high, but can chip | No, requires re-coating |
If you like the look and function of a dark, protective blade finish but don’t want to maintain a living patina, a factory-coated knife like those using DLC or Cerakote finishes may suit you better. But if you enjoy the hands-on process and the character it gives a working blade, patina remains the most accessible option.
There’s an interesting middle ground worth mentioning: rust bluing. This is a traditional gunsmithing technique where the metal is deliberately rusted in a controlled humid environment, then the rust is converted to black oxide by boiling in water, and the process is repeated multiple times to build up a deep, durable blue-black finish. Some custom knifemakers have adapted this technique for carbon steel blades, and it produces a finish that sits somewhere between natural patina and hot bluing — deeper and more uniform than the former, more organic-looking than the latter. Rust bluing at home is a significant project requiring patience and careful attention to safety, but for the dedicated enthusiast, it represents the ultimate expression of controlled oxidation as a finishing technique.
Patina on Different Knife Types
Patina on Folding Knives
Folding knives present unique patina challenges because the blade must be protected while also ensuring the patina doesn’t interfere with the pivot mechanism. When forcing a patina on a folding knife, it’s critical to keep acids away from the pivot area, the lock interface, and any internal springs or washers. The best approach is to disassemble the knife if you’re comfortable doing so, patina only the blade, then reassemble with a drop of oil on the pivot. If disassembly isn’t practical, wrap the handle and pivot area thoroughly in plastic wrap secured with rubber bands, and work carefully to keep the acid application confined to the blade.
Traditional slipjoint knives from makers like Case, GEC (Great Eastern Cutlery), and Boker are particularly prized for their patina potential. The 1095 carbon steel used in many Case knives develops a warm, rich patina that slipjoint collectors often consider more desirable than a pristine polished blade. The small, thin blades of traditional folders patina quickly because their high surface-area-to-volume ratio exposes more steel to reactants relative to the blade’s mass. A Case Trapper or Stockman carried daily in a humid pocket will show noticeable patina within a week.
Patina on Kitchen Knives
Kitchen knives are where patina is most functional and most frequently encountered. High-carbon Japanese gyutos, French-style chef’s knives from makers like K-Sabatier, and German carbon steel blades all develop patina rapidly in kitchen use. The food environment is essentially a continuous mild acid bath — tomatoes, citrus, onions, and even the proteins in meat all contribute to rapid patina formation.
For kitchen knives specifically, many users prefer to let patina develop naturally rather than forcing it, because the gradual development is more even and the patina formed by actual food contact is more stable in the food environment than a chemically forced layer. There’s also a practical consideration: a forced vinegar patina on a kitchen knife will change the first few meals’ flavor slightly if the patina hasn’t been thoroughly neutralized and sealed with oil. Natural food-contact patina doesn’t have this issue because it forms in equilibrium with the same substances the blade will continue to contact.
Patina on Axes and Hatchets
The principles that apply to knife patina transfer directly to axes, hatchets, and other large carbon steel tools. In fact, axes often develop some of the most beautiful and varied patinas because of their large surface area and exposure to tree sap, dirt, and weather during use. An old axe head with decades of patina shows rings and gradients that trace its working history — darker near the bit where contact with green wood was highest, lighter near the poll where it was handled more and cut less.
When forcing a patina on an axe head, the vinegar soak method is usually most practical due to the tool’s size. A piece of PVC pipe capped at one end makes an excellent soaking vessel for axe heads. The same safety considerations apply: keep acids away from the eye where the handle sits, and thoroughly oil the entire head after patinating to protect against rust in the areas where the patina may be thinner.
Documenting Your Patina Journey
Many knife enthusiasts find that documenting their patina development becomes a rewarding part of the hobby. Patina changes over time, and photos taken at regular intervals create a visual timeline of a blade’s life and use. There’s a vibrant community of patina photographers on knife forums and social media who share techniques for capturing the subtle colors and patterns that patina produces.
For the best patina photos, natural indirect lighting works wonders. Direct sunlight tends to wash out the subtle color variations, while overcast daylight or light from a north-facing window brings out the blues, purples, and browns that make patina visually interesting. A dark, non-reflective background helps the blade stand out, and shooting from a slight angle rather than straight-on reveals the surface texture and depth of the oxide layer. Many patina photographers use a polarizing filter to control reflections from any remaining bright steel areas.
The knife community has developed a rich vocabulary for describing patina patterns in these photographs. Terms like “tiger stripe,” “cloud,” “galaxy,” “dragon scale,” and “storm front” all appear regularly in patina appreciation threads, and part of the fun of the hobby is seeing how different steels, acids, and application techniques produce different visual effects that the community then names and celebrates.
Caring for and Maintaining a Patina
A patina isn’t “set and forget.” To keep it protective and attractive, follow a few simple habits:
- Dry immediately after use. Never let a carbon steel blade air-dry on its own, especially after cutting acidic food.
- Apply oil regularly. A thin coat of mineral or camellia oil after cleaning helps preserve the patina and prevents active rust from forming underneath it.
- Avoid dishwashers. Heat, detergent, and prolonged moisture will strip patina and can promote rust; hand wash only.
- Touch up thin spots. If sharpening exposes bright steel along the edge, a quick wipe with vinegar or a fruit slice restores the patina in minutes.
- Store dry. Use a sheath or block that allows airflow rather than sealing the blade in a damp environment; see our guide on making a knife block for storage ideas.
For more detail on the broader topic of moisture control and long-term blade care, our guide on how to prevent rust on knives pairs well with patina maintenance.
The question of which oil to use on a patinated blade comes up frequently, and the answer depends on how you use the knife. For kitchen knives, food-safe mineral oil or camellia oil are the gold standards — both are neutral-tasting, won’t go rancid, and provide excellent moisture protection. For outdoor knives that won’t contact food, many users prefer a slightly heavier oil like Ballistol or even a thin coat of Renaissance Wax for longer-term protection. Avoid vegetable oils like olive or canola oil, which can polymerize and become gummy over time, trapping moisture against the blade rather than repelling it.
Troubleshooting Patina Problems
Blotchy or Uneven Patina
The most common complaint from first-time forced patina attempts is a blotchy, streaky finish. This is almost always caused by inadequate degreasing before application. Even invisible fingerprint oils will block acid from reaching the steel, creating lighter spots where the skin made contact. The fix is prevention: wear clean nitrile or latex gloves throughout the process, and use a strong degreaser like acetone or 91% isopropyl alcohol immediately before applying acid. If the blotchiness has already occurred, you can often blend it by doing a second, lighter application that focuses on the lighter areas.
Patina Rubbing Off
If your new patina seems to wipe off with a cloth or comes off on your hands, the oxide layer likely hasn’t fully stabilized. This sometimes happens with very fresh patinas, especially those done with mild acids like fruit juice. The solution is to let the blade rest for 24-48 hours after patinating before any heavy use, and to apply a light oil coat that will help the oxide layer cure and harden. A properly set patina should not transfer to skin or cloth.
Patina Turning to Rust
If orange spots appear in the middle of your patina, that’s active rust forming through or under the oxide layer. This usually happens when the blade wasn’t dried thoroughly enough after use, or when it was stored in a humid environment without oil. Address it immediately: remove the rust with a gentle abrasive like a pencil eraser or very fine steel wool, clean the area, and re-patina that spot with a targeted vinegar application before oiling.
Patina Color Not as Expected
Different steels produce different patina colors even with the same acid and technique. 1095 tends toward dark grays and blacks, O1 often shows warmer browns, and 52100 can produce surprising blue and purple tones. If your patina color doesn’t match what you’ve seen in photos, it’s likely a steel difference rather than a technique error. Embrace the unique characteristics of your specific blade’s steel.
Common Mistakes to Avoid
Avoid These
- Using full-strength acid without dilution, which can pit rather than patina the surface
- Skipping the degreasing step, leading to a blotchy, uneven finish
- Leaving the blade in acid unattended for hours
- Scrubbing new patina with steel wool immediately after forming it
- Forcing patina on stainless steels that won’t react properly
- Forgetting to oil the blade after rinsing
Do This Instead
- Dilute acids and check progress frequently
- Always degrease with soap or alcohol first
- Set a timer and check every 10–15 minutes
- Let new patina cure for a day before heavy handling
- Confirm your steel type before attempting to force a patina
- Oil lightly every time after cleaning
How to Remove Patina Safely
Sometimes you want a fresh start — maybe a forced patina didn’t turn out as expected, or you’ve acquired a used knife with a patina you’d prefer to replace with your own. Removing patina is straightforward and won’t damage the blade if done correctly.
The gentlest method is metal polish. Products like Flitz, Mother’s Mag, or Simichrome applied with a soft cloth will remove patina gradually with minimal impact on the underlying steel finish. Work in small circular motions, and you’ll see the patina lifting onto the cloth as a gray residue. This method preserves any satin or polish finish underneath.
For faster removal, very fine steel wool (0000 grade) or a Scotch-Brite pad used with a light oil will strip patina efficiently. Work along the existing grain of the steel, not against it, to avoid introducing new scratches. A paste of baking soda and water applied with a cloth is another effective and extremely gentle option that’s food-safe and uses nothing you don’t already have in the kitchen.
The most aggressive (and fastest) method is fine-grit wet/dry sandpaper, starting at 600 grit and working up to 1000 or 1500 grit for a satin finish. This will completely reset the blade surface, removing not just patina but also any existing factory finish. Only go this route if you’re prepared to refinish the entire blade.
After any patina removal, the blade will be bright steel again and should be oiled immediately to prevent flash rusting, which can occur within minutes in humid conditions. The blade will also begin re-patinaing with use, so have a plan for whether you’ll force a new patina or let it develop naturally.
Patina and Edge Retention: What Science Says
A persistent question in knife circles is whether patina affects edge retention, either positively or negatively. The short answer, based on both metallurgical understanding and extensive user experience, is that patina has no measurable effect on edge retention in normal use. The oxide layer is only a few microns thick — far thinner than the apex of a sharpened edge — and does not penetrate deeply enough into the steel matrix to alter its hardness, carbide structure, or wear resistance.
However, there is one edge-related consideration worth noting. When you sharpen a patinated blade, you expose fresh, bright steel at the very edge bevel. This thin strip of unpatinated steel can be more vulnerable to corrosion right at the most critical part of the blade. The solution is simple: after sharpening, make a point of cutting something acidic — an apple, a lemon, or a tomato — to quickly re-establish patina on the fresh edge steel. Some users deliberately do a quick vinegar wipe along the edge after each sharpening session for exactly this purpose.
There’s also an interesting optical effect: a patinated blade with a bright, freshly sharpened edge creates a beautiful contrast line that makes the edge stand out visually. Some knife enthusiasts consider this the best-looking state a carbon steel blade can be in — dark, seasoned body with a gleaming silver edge.
Food Safety and Patina: Complete Guide
The food safety question around patina is one of the most frequently asked and most thoroughly answered topics in the knife world. The consensus among metallurgists, knife makers, and food safety experts is clear: a properly formed and maintained patina is completely food-safe. The oxide layer is chemically stable and does not transfer harmful substances to food. Millions of meals have been prepared with patinated carbon steel knives over centuries of culinary history with no documented health issues attributable to the patina itself.
That said, there are food safety practices specific to carbon steel that responsible users should follow. Always wash the blade with soap and water after cutting raw meat, just as you would with any knife. Don’t let food residue dry on the blade, as this can create localized corrosion that penetrates the patina. And if you’re using a newly forced patina, give it at least 24 hours to stabilize and seal with oil before food contact, as very fresh, unsealed oxide can impart a slight metallic taste.
For commercial kitchen use, the primary concern is usually aesthetic rather than hygienic. Some health inspectors who are unfamiliar with carbon steel may question a patinated blade, and some diners may find the appearance unappetizing. In these settings, a light natural patina that’s clearly gray-blue rather than rusty-orange is generally accepted, while a heavy, multicolored forced patina might raise eyebrows even though it’s equally safe.
The best food-safe sealers for patinated kitchen knives are food-grade mineral oil (readily available at pharmacies), camellia oil (traditional Japanese blade oil), or a mixture of mineral oil and beeswax that creates a slightly more durable coating. All of these are odorless, tasteless, and won’t go rancid over time.
Patina vs. Stonewash and Other Factory Finishes
Many modern knives come with factory finishes that can be confused with or compared to patina. Stonewashing, bead blasting, acid washing, and tumbling all create non-reflective, textured surfaces that share some visual characteristics with patina but are fundamentally different in how they’re created and how they behave.
Stonewashing involves tumbling the blade in an abrasive media, which creates a random pattern of microscopic scratches that scatter light and reduce reflectivity. It’s purely mechanical — no chemical change occurs. Acid washing, sometimes called “acid stonewash,” combines a brief acid etch to darken the steel with subsequent stonewashing to create a distressed, mottled gray finish. This is closer to patina in that it involves an acid reaction, but it’s typically sealed with a clear coat or oil and doesn’t continue to evolve with use.
A natural or forced patina differs from all of these in that it’s a living finish — it changes, deepens, and responds to the environment. A stonewashed blade will look essentially the same after five years of use as it did on day one. A patinated blade will show its history in its coloration and pattern. For users who value that living quality, no factory finish can truly substitute for real patina.
Patina on Axes, Hatchets, and Large Tools
The principles that govern knife patina apply equally to larger carbon steel tools, but the scale and use patterns create some interesting differences. Axe heads, for example, tend to develop the most pronounced patina near the bit where contact with green wood, sap, and moisture is highest. The cheeks of the axe often show striking gradient patterns as the patina intensity fades from the edge toward the eye. These natural gradients on old axes are highly prized by collectors and tool restorers.
For those who want to force a patina on an axe or hatchet, the vinegar soak method scaled up is usually the most practical approach. A section of PVC pipe with a cap glued on one end makes an excellent soaking vessel. The same rules apply: degrease thoroughly first, check frequently during the soak, and seal with oil afterward. One additional consideration for axes is that the eye — where the handle fits — should be protected from acid exposure, as a deeply patinated eye can become slightly rougher and may not hold the handle as securely. Mask off the eye with tape or plug it with a cork before soaking.
Garden tools like shovels, hoes, and pruning shears also benefit from natural patina development. Many gardeners deliberately let their carbon steel tools develop a patina, then wipe them down with an oily rag after each use. The patina protects against rust during storage while being completely harmless to soil and plants when the tool is in use. This is essentially the same maintenance philosophy applied to tools instead of knives, and it works just as well.
Best Knives for Developing a Patina
If you’re specifically shopping for a blade to patina, look for plain high-carbon steels without added chromium coatings. Some excellent starting points include the Morakniv Companion in carbon steel, the Ontario RAT 1, and the ESEE JG3. For hand-forged options with dramatic, organic patina potential, see our overview of hand-forged knives.
Beyond these well-known options, there are several other excellent patina platforms worth considering. The Opinel line of French folding knives, particularly the carbon steel versions, are legendary for their patina potential at a very accessible price point. A carbon Opinel No. 8 carried daily and used for food prep will develop a beautiful, even patina within weeks, and the thin blade geometry makes color changes particularly visible. Similarly, the classic Douk-Douk and Mercator knives use carbon steel that patinas readily and have been developing character-rich finishes on working knives for generations.
For those interested in the high-end custom knife world, carbon steel blades from makers who work in 52100, W2, or CruForgeV offer some of the most dramatic patina potential available. These steels often include small amounts of alloying elements like vanadium or tungsten that influence oxide color formation, producing patterns that simpler steels can’t match. A custom chef’s knife in 52100 with a hand-rubbed satin finish and a carefully developed patina is widely considered one of the most beautiful objects in the knife world.
| Knife | Steel | Patina Speed | Best Use |
|---|---|---|---|
| Morakniv Companion | Carbon steel (1075-equivalent) | Fast | Bushcraft, general outdoor use |
| Ontario RAT 1 / RAT 2 | 1095 | Fast | EDC, survival |
| ESEE JG3 | 1095 | Fast | Field dressing, camp tasks |
| Morakniv Garberg (carbon version) | 1095 | Moderate | Bushcraft, fixed-blade EDC |
| Opinel No. 8 Carbon | XC90 carbon steel | Fast | EDC, food prep, picnics |
| Case Trapper (carbon) | 1095 | Fast | Traditional EDC, light tasks |

Ready to start your own patina project?
Grab a high-carbon steel blade built to patina beautifully with use.
Check Price on AmazonThe Patina Community: Forums, Photos, and Inspiration
One of the most rewarding aspects of the patina hobby is the community that has grown up around it. Online forums like BladeForums, Reddit’s r/knives and r/chefknives communities, and numerous Facebook groups dedicated to carbon steel and traditional knives feature extensive patina photo threads where members share their results, ask for advice, and celebrate particularly beautiful examples.
The #patina hashtag on Instagram and other social platforms reveals an incredible diversity of approaches and results. Some users pursue the darkest possible black patina through extended vinegar soaks, while others cultivate subtle straw-and-blue tones through careful natural development. There are patina artists who create elaborate masked designs that look more like engravings than chemical reactions, and purists who insist that the only “honest” patina is one earned through use alone.
This community aspect adds a social dimension to what might otherwise be a solitary pursuit. Sharing your patina journey, learning from others’ experiments, and eventually contributing your own knowledge back to the community is part of what makes carbon steel knife ownership a genuine hobby rather than just a purchasing decision.
Frequently Asked Questions
Is patina safe for food contact?
Yes. Patina is a stable oxide layer, not a contaminant, and is considered food-safe by most culinary and cutlery experts. Many traditional kitchen knives are used with an intentional patina for decades.
Will patina wear off over time?
Light surface patina can wear thin with heavy sharpening or scrubbing, but it typically redevelops with continued use or a quick forced touch-up.
Can I remove a patina if I don’t like it?
Yes. A metal polish, fine sandpaper, or a paste of baking soda and water can strip patina back to bright steel without damaging the blade, though it will begin patinating again with use.
Does patina affect sharpness or edge retention?
No. Patina is a surface-level oxide layer and does not affect the blade’s geometry, hardness, or edge retention in any meaningful way.
How long does it take for a natural patina to form?
With regular use on acidic foods, a visible patina can begin within days, while a full, even coat typically takes several weeks to a few months.
Can stainless steel knives develop patina?
Generally no. High-chromium stainless steels like S35VN or 14C28N are specifically engineered to resist the oxidation that creates patina.
What’s the fastest way to force a patina?
A diluted vinegar soak typically produces the darkest patina fastest, often within 20 to 40 minutes, though mustard gives a more even, controllable result.
Does patina protect against rust completely?
No. Patina reduces the rate of future oxidation but doesn’t eliminate the need for drying and light oiling, especially in humid climates.
Why does my patina look blotchy instead of even?
Uneven patina is usually caused by leftover oils or fingerprints on the blade before applying the acid. Thorough degreasing before starting solves this in most cases.
Can I speed up a natural patina without chemicals?
Yes, simply cutting acidic fruits like apples, tomatoes, and citrus regularly and letting the residue sit briefly before washing will accelerate natural patina formation.
Is a black patina different from a gray one?
The color depends on the acid strength and reaction time. Stronger, longer exposures like extended vinegar soaks tend to darken toward black, while milder methods produce lighter gray or straw tones.
Should beginners start with a cheap knife to practice patina techniques?
It’s a reasonable approach, since forcing a patina is low-risk and reversible, but any plain carbon steel blade will work fine for learning the process.
Can I use instant coffee for a patina?
Yes. Strong instant coffee (mixed into a thick paste with minimal water) produces warm brown and bronze tones that look distinctly different from vinegar or mustard patinas. Apply as a paste, let sit 1-4 hours, then rinse and oil.
Will patina form on D2 steel?
Yes, but slowly. D2 is semi-stainless and contains about 11-12% chromium, so it resists corrosion more than plain carbon steels. Expect subtle, uniform gray tones rather than dramatic multicolored patterns, and the process may take weeks or months rather than hours or days.
How do I patina just part of the blade?
Mask off the areas you want to keep bright with painter’s tape, nail polish, or a resist like Vaseline. Apply acid to the exposed areas, then remove the mask after rinsing. Multiple masked sessions can create complex multi-tone patterns.
Is it safe to force a patina indoors?
The methods described here use mild household acids (vinegar, mustard, fruit acids) that are safe for indoor use with basic ventilation. Avoid creating airborne mists, and work over a sink or protected surface. Stronger industrial acids should only be used with proper safety equipment and ventilation.
Can I patina a Damascus or pattern-welded blade?
Yes, and the results can be spectacular. Because Damascus steel combines layers of different steel compositions (often a high-carbon steel and a nickel-bearing steel), acids etch the layers at different rates, dramatically enhancing the pattern visibility. A brief vinegar or coffee patina on Damascus can make the pattern “pop” much more than the unetched blade.
What’s the difference between patina and an acid etch?
They’re on a spectrum. A light patina is a thin oxide layer produced by mild, usually food-grade acids over short time periods. An acid etch is a deeper, more aggressive treatment using stronger acids (often ferric chloride) over longer periods that actually removes some surface metal rather than just oxidizing it. Etches are more permanent but also more likely to affect surface texture.
Does patina affect the warranty on my knife?
It depends on the manufacturer. Most makers of carbon steel knives (ESEE, Mora, Opinel) consider patina normal and expected, and it won’t affect warranty coverage. Some manufacturers of stainless knives may have different policies. When in doubt, check your warranty terms or contact the maker before forcing a patina.
Conclusion
Patina is one of the simplest and most rewarding aspects of owning a carbon steel knife. Far from being a flaw, it’s a natural protective layer that carbon steel forms to defend itself against the very corrosion that untreated steel is vulnerable to. Whether you let it build gradually through everyday use, or force it in an afternoon with mustard or vinegar, understanding the process gives you full control over how your blade looks and performs over its lifetime.
If you’re building out a collection of carbon steel tools, pair your new patina knowledge with proper care habits — drying, oiling, and mindful storage — and your blades will reward you with decades of dependable service and a look that only improves with age. The journey from bright, shiny new steel to a richly patinated working tool is one of the genuine pleasures of knife ownership, a slow collaboration between maker, user, and the fundamental chemistry of iron.
Whether you’re drawn to the practical corrosion resistance, the aesthetic appeal of a beautifully seasoned blade, or the simple satisfaction of maintaining a tool that grows more personal with every use, patina represents something increasingly rare in the modern world: a finish that you don’t just buy, but that you and your knife create together over time.

Start your patina journey today
Browse top-rated carbon steel knives perfect for developing a lasting, protective patina.
Shop Carbon Steel Knives on Amazon