
Nakiri vs. Usuba Knife: The Double-Bevel vs. Single-Bevel Showdown
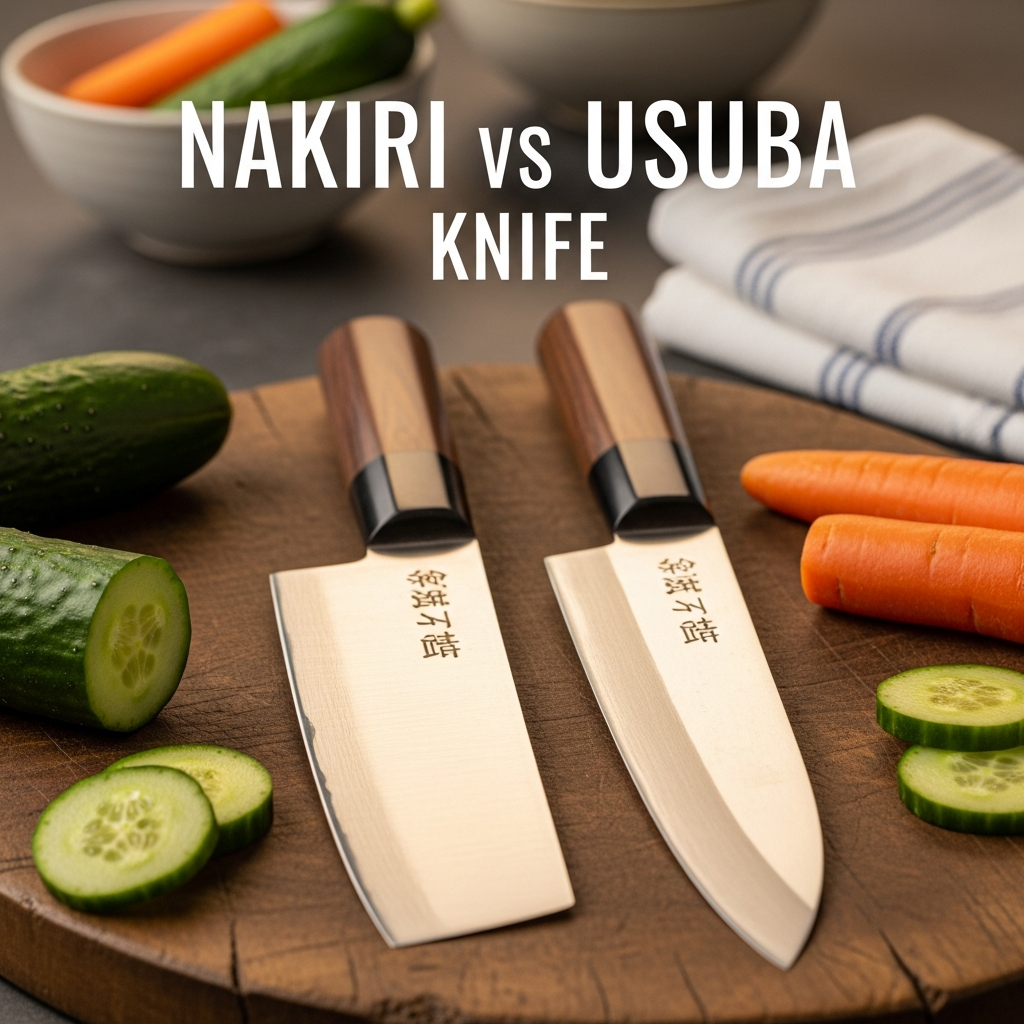
If you are exploring the world of best Japanese kitchen knives, you have likely encountered two rectangular, flat-edged blades that look remarkably similar: the Nakiri and the Usuba.
To the untrained eye, they are both “vegetable cleavers.” However, the difference between them is the single most important distinction in Japanese cutlery: the grind. One is a user-friendly tool found in every Japanese household; the other is a specialized instrument used by Michelin-starred sushi chefs.
Are you a home cook looking to speed up your prep? Or are you a culinary artist aiming for paper-thin precision? In this comprehensive Nakiri vs. Usuba guide, we will dissect the geometry, the technique, and the maintenance to help you choose the right tool.
1. The Nakiri: The Home Cook’s Hero
The Nakiri bocho (translating to “leaf cutter”) is the Japanese answer to the Western chef’s knife for vegetables. It is the most popular vegetable knife for home cooks. Why? Because it is double-beveled.
What is a Nakiri?
Like a Santoku or a Western Chef’s knife, the Nakiri is sharpened on both sides (usually a 50/50 or 70/30 split). This means it cuts straight down without steering. The flat edge allows you to chop all the way to the cutting board without the “accordion” effect (where vegetables are still attached at the bottom).
For a deep dive into its uses, read our guide: What is a Nakiri Knife Used For?.
2. The Usuba: The Professional’s Scalpel
The Usuba bocho (translating to “thin blade”) is a traditional Japanese knife used by professionals. It is single-beveled (chisel edge). This means it is flat (or slightly concave) on the back side and angled on the front side.
What is an Usuba?
The single bevel creates an incredibly acute edge (often 10-15 degrees total). This allows for extreme precision, such as Katsuramuki (rotary peeling a daikon radish into a transparent sheet). However, single-bevel knives “steer” or drift to the left (for right-handed knives) while cutting. This requires significant skill to control.
External Insight
Knifewear, a leading expert in Japanese steel, explains: “While they look similar… the Usuba is a single bevel knife, meaning it is only sharpened on one side.” Read their full breakdown here: Knife vs. Knife: Nakiri or Usuba?
3. A Brief History: From Edo-Period Kitchens to Modern Prep Stations
To really understand the Nakiri vs. Usuba divide, it helps to know where each blade came from. Neither knife appeared overnight — both are the product of centuries of Japanese culinary specialization, and their differing histories explain exactly why one ended up in every home kitchen while the other stayed locked behind the doors of professional training.
The Nakiri’s Household Origins
The Nakiri bocho traces its lineage back to the Edo period (1603–1868), a time when Japan’s growing urban population needed practical, affordable tools for daily cooking. Professional single-bevel knives were expensive, difficult to maintain, and required years of training to use safely. Blacksmiths responded by producing a double-bevel vegetable knife that ordinary households could sharpen themselves and use without specialized instruction. This democratization of blade technology is precisely why the Nakiri remains, to this day, the default vegetable knife found in Japanese homes — it was designed from the outset to be forgiving, symmetrical, and low-maintenance.
Interestingly, the Nakiri’s rectangular profile was also a practical response to the vegetables of the era: daikon radish, cabbage, and root vegetables that benefit from a tall, flat blade capable of chopping through dense produce without wedging. That same rectangular silhouette persists in nearly every modern Nakiri, including Western-market versions sold by brands like Global and Wüsthof.
The Usuba’s Professional Lineage
The Usuba, by contrast, developed inside the walled garden of professional Japanese kitchens, particularly within the Kaiseki tradition — the elaborate multi-course dining format that treats vegetable preparation with the same reverence given to fish and rice. Because Kaiseki chefs needed a blade capable of gossamer-thin cuts and decorative work like Katsuramuki, the single-bevel chisel grind was preserved and refined rather than simplified. Training to use an Usuba became, and remains, a rite of passage in Japanese culinary apprenticeships, often taking years before a chef is trusted to sharpen and wield one independently.
This professional gatekeeping is a big part of why the Usuba never became a household staple outside Japan (or even inside it, for that matter). It was never designed to be easy. It was designed to be precise, and precision has always demanded a steeper learning curve.
Why This History Matters Today
Knowing this backstory answers one of the most common questions people ask: “Is a Nakiri just a beginner’s Usuba?” Not exactly. They evolved along separate tracks to serve separate purposes — one built for accessibility, one built for mastery. Neither is a “lesser” version of the other; they’re parallel solutions to the same basic problem of cutting vegetables cleanly.
4. Head-to-Head: The Specs Breakdown
| Feature | Nakiri | Usuba |
|---|---|---|
| Bevel (Grind) | Double Bevel (Like Western knives) | Single Bevel (Chisel Edge) |
| Skill Level | Beginner to Intermediate | Advanced / Professional |
| Weight | Lightweight / Thin | Heavier / Thicker Spine |
| Sharpening | Easy (Standard methods) | Difficult (Requires Urasuki knowledge) |
| Primary Use | General Vegetable Prep | Intricate Carving, Katsuramuki |
| Price | Affordable ($50 – $200) | Expensive ($200 – $600+) |
5. Steel Types Compared: White Steel, Blue Steel, VG-10, and Stainless
The steel inside the blade matters just as much as the bevel geometry, and it’s one of the biggest keyword gaps in most Nakiri vs. Usuba comparisons online. Both knife types are available in a range of steels, but the traditional and modern options diverge in important ways.
White Steel (Shirogami)
White Steel is a very pure, high-carbon steel with minimal alloying elements. It’s prized by traditional Usuba makers because it takes an exceptionally keen edge and is relatively easy for an experienced sharpener to work with on a whetstone. The tradeoff is reactivity — White Steel blades will discolor, patina, and rust quickly if not dried immediately after use. This is one reason true professional Usubas demand disciplined maintenance habits that go beyond what most home cooks are used to.
Blue Steel (Aogami)
Blue Steel adds chromium and tungsten to the White Steel formula, improving edge retention and toughness at a small cost to sharpenability. Many premium Usuba and Nakiri knives, including higher-end Yoshihiro and Sakai Takayuki models, use Blue Steel #1 or #2 for a balance of long-lasting sharpness and manageable maintenance. It still requires the same drying discipline as White Steel, since it is not stainless.
VG-10 and Modern Stainless Alternatives
For home cooks who want the geometry of a Nakiri without the maintenance headaches of carbon steel, VG-10 stainless is the go-to choice. It’s the steel used in the Shun Classic line, offering strong edge retention, resistance to rust, and far more forgiving care requirements. Stainless clad Damascus patterns, like those seen on many Shun and Miyabi Nakiris, layer softer steel around a VG-10 or similar core for both durability and aesthetics.
Some budget Usuba-style knives are also made from simpler stainless alloys like AUS-8 or 420J2. These are easier to maintain but will not hold an edge nearly as long as carbon steel, and true single-bevel geometry is harder to find at this price point.
| Steel Type | Edge Retention | Ease of Sharpening | Rust Resistance |
|---|---|---|---|
| White Steel (Shirogami) | Good | Excellent | Poor — requires drying after every use |
| Blue Steel (Aogami) | Very Good | Good | Poor — same carbon-steel care rules apply |
| VG-10 Stainless | Very Good | Moderate | Excellent |
| Budget Stainless (AUS-8, 420J2) | Fair | Easy | Excellent |
6. Edge Geometry and Bevel Angles Explained
Understanding the actual numbers behind “double bevel” and “single bevel” helps explain why these knives feel so different in hand.
A typical Nakiri is ground to roughly 15–17 degrees per side, for a combined cutting angle in the neighborhood of 30–34 degrees — similar to a Western chef’s knife or Santoku. This symmetrical geometry is inherently self-correcting: because both sides are ground equally, the blade naturally tracks straight down through produce with no sideways force.
An Usuba, on the other hand, may be ground to a total edge angle as low as 10–15 degrees, but almost all of that angle sits on a single face. The back is left flat or slightly hollowed (the Urasuki). Because all the cutting geometry is concentrated on one side, the blade experiences uneven resistance as it moves through food, which is what creates the characteristic “steering” or drift toward the sharpened side. Professional users learn to counteract this drift with subtle wrist and grip adjustments — a skill that typically takes months, not days, to develop.
This is also why converting a dull Usuba back to peak performance is so different from touching up a Nakiri. Sharpening a Nakiri is largely about maintaining two even, mirrored bevels. Sharpening an Usuba is about maintaining one precise bevel on the front and preserving the flatness (or slight concavity) of the back — miss either element and the knife will perform poorly no matter how sharp the edge feels to the touch.
7. Handle Styles: Wa-Handle vs. Western Handle
Handle construction is another area first-time buyers often overlook, and it’s a meaningful difference between these two knife families.
The Traditional Wa-Handle
Most authentic Usuba knives are fitted with a Wa-handle: a lightweight, often octagonal or D-shaped wooden handle secured to the tang with a simple friction fit rather than rivets. This design keeps the knife’s balance point close to the blade, which is exactly what’s needed for the fine control required during Katsuramuki and decorative work. Wa-handles are typically unfinished magnolia or walnut wood and are not sealed with heavy lacquer, so they should never be soaked in water.
Western (Yo) Handles on Nakiris
Nakiris sold to a global audience — including most Shun, Global, and Wüsthof models — commonly use a Western-style (Yo) handle: a riveted, often synthetic or resin-composite handle similar to what you’d find on a European chef’s knife. These handles are heavier, more durable in a busy kitchen, and easier for cooks accustomed to Western knives to pick up without an adjustment period. Some traditional Japanese makers, like Tojiro’s DP line, still offer Nakiris in a Wa-handle configuration for cooks who prefer the lighter, more nimble feel.
Neither handle style is objectively better — it comes down to what you’re used to holding and how much you value traditional balance versus everyday durability.
8. Regional Styles: Kanto vs. Kansai Usuba Shapes
One nuance that rarely makes it into beginner guides is that the Usuba itself is not a single shape — it comes in two distinct regional profiles.
Kanto-Style (Edo-Usuba)
The Kanto-style Usuba, associated with the Tokyo (Edo) region, has a squared-off tip and a straight spine, giving it a boxier silhouette closer to what most people picture when they think “Usuba.”
Kansai-Style (Kamagata-Usuba)
The Kansai-style, or Kamagata-Usuba, associated with the Osaka region, has a rounded, sickle-shaped tip (kamagata literally means “sickle-shaped”). This rounded profile is often preferred for certain rotary peeling and carving techniques, and it’s the shape most commonly seen on higher-end decorative-focused Usuba knives from Sakai-based makers.
Nakiri knives don’t really have this same regional split — their shape has stayed fairly standardized nationwide precisely because it was designed for mass practicality rather than regional culinary tradition.
9. Performance in the Kitchen
Cutting with a Nakiri
Using a Nakiri is intuitive. You lift the blade and chop straight down. If you are used to a Chef’s Knife or Santoku, the transition is seamless. It is perfect for large volume prep—onions, cabbage, carrots—making it a favorite for home cooks and vegetarians.
Cutting with an Usuba
Using an Usuba requires training. Because the blade steers, you must compensate with your grip angle. However, the cut is cleaner. It separates cells rather than crushing them, which is said to preserve the flavor and freshness of vegetables longer. This is why high-end sushi restaurants use them.
10. Mastering Katsuramuki: A Step-by-Step Introduction
Since Katsuramuki keeps coming up as the signature Usuba technique, it’s worth breaking down what actually happens during this famous rotary peeling method — even if you’re not ready to attempt it yet.
- Prepare the daikon: Cut a section of daikon radish (or cucumber) into a cylinder roughly 3–4 inches long, with the skin still on.
- Position the blade: Hold the Usuba nearly flat against the cylinder’s surface, with the sharpened edge facing the radish and the thumb of your non-cutting hand guiding the blade’s depth from behind.
- Rotate, don’t slice: Instead of pushing the blade forward like a normal cut, you rotate the daikon cylinder against the stationary blade, peeling off one continuous, paper-thin ribbon.
- Maintain consistent thickness: The goal is a sheet thin enough to see light through, wound off in a single unbroken piece that can be several feet long when unrolled.
- Finish the cut: The resulting sheet can then be julienned into sengiri garnish or used whole as a wrap for sashimi presentations.
This technique is essentially impossible with a double-bevel Nakiri, because the symmetrical edge geometry causes the blade to dig unevenly into the rotating cylinder rather than shaving a clean, consistent ribbon. It’s the clearest real-world illustration of why professional kitchens keep an Usuba around even when a Nakiri handles 90% of daily vegetable prep.
11. The Kiritsuke-Usuba: A Hybrid Worth Knowing
Advanced buyers researching this topic often run into a third term that adds confusion: the Kiritsuke-Usuba. This is a specialized hybrid blade that combines the tall, flat profile of an Usuba with a angled, pointed tip similar to a Kiritsuke gyuto. It’s still single-beveled and still requires the same Urasuki maintenance as a standard Usuba, but the pointed tip allows for a wider range of motion — including some slicing and piercing tasks that a flat-tipped Usuba can’t handle as gracefully.
This hybrid is typically reserved for senior chefs who have already mastered the standard Usuba and want a single knife capable of covering both vegetable and light protein work in a Kaiseki setting. It is not a beginner-friendly alternative to either the Nakiri or the standard Usuba, and it’s rarely necessary for home kitchens.
12. Top Product Recommendations
We have tested the best chef knife brands to find the leaders in these categories.
 Shun Classic 6.5″ Nakiri
The gold standard. VG-MAX steel with Damascus cladding. Double-bevel and easy to maintain. See our Shun vs Wusthof review.
Check Price on Amazon Yoshihiro Hongasumi Usuba
A true professional tool. Blue Steel #2 (High Carbon) with a single bevel. Requires expert care and sharpening skills. Not for beginners.
Check Price on Amazon13. Brand Comparisons: Where to Buy?
Not all brands make true Usubas. Many sell “Usuba-style” knives that are actually double-bevel Nakiris. Be careful!
For Nakiris (Home Use)
- Tojiro: The Tojiro DP Nakiri is legendary for value. (See Tojiro vs Shun).
- Global: The G-5 is a modern, stainless Nakiri. (See Global vs Wusthof).
- Wusthof/Zwilling: Even German brands make Nakiris now, though they are often heavier. (See Wusthof vs Zwilling vs Shun).
- Mercer/Victorinox: Excellent budget options. (See Mercer vs Victorinox).
For Usubas (Pro Use)
- Kamikoto: Famous for single-bevel knives, though controversial in marketing. (See Kamikoto vs Shun).
- Yoshihiro / Sakai Takayuki: Authentic Japanese makers.
- Shun: The “Shun Pro” line features single-bevel blades, but their Classic line is double-bevel.
14. Buying Guide by Budget
Whichever knife you’re leaning toward, it helps to know what you’re actually getting at each price tier.
Entry-Level ($50–$100)
At this tier, you’ll mostly find stainless Nakiris from brands like Mercer, Victorinox, and entry-line Tojiro. True single-bevel Usubas are rare below $100 — anything marketed as an “Usuba” this cheap is almost always a double-bevel Nakiri wearing an Usuba-style name for marketing purposes. Read product descriptions carefully and look for explicit mention of a single bevel or Urasuki if authenticity matters to you.
Mid-Range ($100–$250)
This is the sweet spot for a genuine stepping-stone knife. Shun Classic Nakiris and Tojiro DP Nakiris sit here, along with entry-level, factory-made single-bevel Usubas from brands like Yoshihiro. Steel is typically VG-10 stainless on the Nakiri side, or a basic White/Blue Steel-clad construction on entry Usubas.
Premium and Artisan ($250–$600+)
Above $250, you start seeing hand-forged, Sakai-region or Seki-region Usubas from established workshops, often in Blue Steel #1 or #2 with hand-fitted Wa-handles. Premium Nakiris in this range are usually differentiated by hand-hammered Damascus finishes, exotic handle materials, or limited-production runs rather than dramatic functional upgrades — the core double-bevel geometry performs similarly to a well-made $150 Nakiri.
15. Choosing the Right Size: Blade Length Guide
Blade length is another spec that’s easy to overlook but has a real impact on how a knife performs day to day.
- 150–160mm Nakiri: Compact and nimble, ideal for smaller hands or cooks who primarily prep single portions rather than large batches.
- 165–180mm Nakiri: The most common range, offering the best balance between control and coverage for everyday household prep — this is the size of most popular models, including the Shun Classic.
- 180–210mm Usuba: Professional Usubas tend to run longer than home Nakiris, since a longer blade allows a more continuous ribbon during Katsuramuki and reduces the number of strokes needed for large-format decorative work.
As a rule of thumb, a longer blade is not automatically “better” — it’s better only if your prep volume and technique actually benefit from the extra length. Most home cooks are well served by a 165mm Nakiri.
16. Left-Handed Nakiri and Usuba Options
Handedness is a genuine consideration with these two knife types, and the two behave very differently.
Because a Nakiri is ground symmetrically, it is fully ambidextrous — a left-handed cook can pick up any standard Nakiri and use it exactly as intended, with no adjustment needed. This is one of the quieter reasons the Nakiri remains the more universally recommended choice for households with mixed-handedness cooks.
An Usuba is a different story. Because the bevel sits on one face only, a standard Usuba is ground specifically for right-handed use, and the blade will steer in the wrong direction for a left-handed cook. True left-handed Usubas do exist, ground with the bevel on the opposite face, but they are a special-order item from most Japanese makers, typically carry a price premium, and have much longer lead times than right-handed stock. If you are left-handed and set on an authentic single-bevel Usuba, budget extra time and expect to contact the maker or retailer directly rather than buying off the shelf.
17. Maintenance: The Deal Breaker
The maintenance difference is massive.
- Nakiri: Can be sharpened on any standard system (whetstone, electric). (See best electric sharpeners).
- Usuba: Requires advanced whetstone skills. You must maintain the Urasuki (concave back). If you sharpen it like a normal knife, you will ruin it. Check our best knives sharpener guide for stones.
Common Rules for Both:
1. No Dishwasher: Heat destroys handles. (See dishwasher safe guide).
2. Dry Immediately: Especially for high-carbon Usubas. Learn how to remove rust.
3. Storage: Protect the edge! Use a drawer organizer or a magnetic strip.
18. Sharpening Angles and Whetstone Grit Progression
If you’re ready to actually maintain one of these knives at home, having concrete numbers helps.
For the Nakiri
Maintain a consistent angle of roughly 15–17 degrees per side. A typical progression runs from a 400–600 grit stone to reset a dull or chipped edge, up through 1000–2000 grit for everyday maintenance, and finishing on a 3000–6000 grit stone if you want a polished, push-cutting edge. Because both sides are symmetrical, you simply mirror the same number of strokes on each face.
For the Usuba
The front bevel is typically maintained at a very low 8–10 degrees relative to the blade face — far flatter than most Western sharpening guides assume. Work the front bevel through a similar 400–600 to 3000–6000 grit progression, but you must also periodically flatten the back on a coarser stone (often 400–1000 grit) to maintain the Urasuki without removing so much material that the hollow disappears entirely. This back-flattening step, called ura-dashi or ura-oshi depending on the technique used, is the single most common thing that goes wrong when Western cooks attempt to sharpen an Usuba using only Nakiri-style habits. Skipping it, or over-flattening the back, is the fastest way to ruin the knife’s geometry.
If any of this sounds intimidating, it should — it’s exactly why most retailers recommend professional sharpening services for a genuine Usuba until you’ve had hands-on instruction from someone experienced with single-bevel geometry.
19. Developing (and Caring For) a Patina
Because premium Usubas and many high-end Nakiris use reactive carbon steels like White Steel or Blue Steel, they will naturally develop a patina — a thin, gray-to-blue oxide layer — with use. This is normal, expected, and actually beneficial: a stable patina acts as a mild protective barrier against deeper rust, and many experienced cooks intentionally accelerate it with a quick vinegar or mustard wipe on a brand-new blade.
To manage patina responsibly:
- Wipe the blade dry immediately after each use — never let it air dry on its own.
- Avoid cutting high-acid foods (citrus, tomatoes, vinegar-based marinades) for extended periods without wiping the blade, since acidic contact accelerates blotchy, uneven patina rather than a smooth, even layer.
- If a patina becomes uneven or develops small rust spots, a light pass with a fine-grit sharpening stone or a rust eraser can even it back out.
- Never mistake a patina for dirt and try to scrub it off with an abrasive pad — this removes the protective layer and exposes fresh steel to renewed rust risk.
Stainless VG-10 Nakiris won’t develop this patina at all, which is one more reason they’re the lower-maintenance choice for cooks who don’t want to think about blade care between uses.
20. What About Other Knives?
Don’t use these for everything.
Need to cut meat? Use a Cleaver or Meat Cleaver.
Need to slice bread? Use a Bread Knife.
Need to peel? Use a Paring Knife.
Breaking down fish? You need a Fillet Knife.
21. Nakiri, Usuba, or Chinese Cleaver? Clearing Up a Common Mix-Up
One confusion that trips up a lot of first-time buyers is mistaking either the Nakiri or Usuba for a Chinese vegetable cleaver (caidao). They do look similar at a glance — all three are tall, rectangular, flat-profile blades — but the construction and intended technique are quite different.
Blade Height and Weight
A Chinese cleaver is typically taller and noticeably heavier than either Japanese knife, since it’s designed partly for rocking and partly for using the flat of the blade to scoop, smash garlic, or transfer chopped ingredients. Nakiris and Usubas are thinner and lighter, optimized purely for clean vertical cuts rather than multi-purpose kitchen utility.
Bevel Construction
Chinese cleavers are almost always double-beveled, similar to a Nakiri, but the bevel angle tends to be wider and more obtuse to withstand the heavier chopping and occasional bone-adjacent work some cleaver styles are asked to do. This makes a cleaver more durable but less capable of the fine, precise slicing a Nakiri or especially an Usuba is built for.
Which Should You Buy?
If your cooking leans toward Chinese or broader Asian cuisine and you want one knife that smashes garlic, transfers ingredients, and handles heavier chopping, a cleaver may suit you better. If your priority is clean, precise Japanese-style vegetable prep — or you’re specifically interested in techniques like Katsuramuki — the Nakiri or Usuba remain the better-suited tools. They are not interchangeable despite the superficial resemblance, and buying the wrong one for your cooking style is a common source of buyer’s remorse in this category.
22. Storage and Humidity Control
Beyond the basic “no dishwasher, dry immediately” rules covered earlier, serious carbon-steel Usuba and Nakiri owners should also think about ambient humidity, since it has a measurable effect on long-term blade condition.
- Avoid damp drawers: Storing a carbon-steel blade in a humid drawer near a sink or dishwasher accelerates corrosion even if the blade was dried after use. A dedicated knife block, magnetic strip, or saya (wooden sheath) away from moisture sources is strongly preferred.
- Use a saya for carbon steel: A traditional wooden saya not only protects the edge during storage but also allows residual moisture to wick away from the blade rather than trapping it against a sealed material like plastic or rubber.
- Consider a desiccant in humid climates: Cooks in coastal or tropical climates sometimes keep a small silica gel packet inside their knife roll or storage block to control ambient moisture around reactive carbon steel.
- Stainless Nakiris are far more forgiving: If you live somewhere humid and don’t want to think about any of this, a VG-10 stainless Nakiri removes most of the storage anxiety entirely.
23. A Sample Care Routine
To make all of this maintenance advice concrete, here’s what a realistic day-to-day care routine looks like for each knife.
Nakiri Care Routine
- Hand wash immediately after use with mild soap and warm water.
- Dry thoroughly with a towel before returning to storage.
- Hone or strop lightly every few uses to maintain edge alignment.
- Sharpen on a whetstone every few weeks depending on use, following the 15–17 degree per side angle discussed earlier.
Usuba Care Routine
- Wipe the blade dry between different food items, not just at the end of the session, especially if working with acidic produce.
- Hand wash and dry thoroughly immediately after use — never let it sit even briefly in a sink.
- Inspect the Urasuki periodically for unevenness that would indicate it’s time for a back-flattening pass.
- Sharpen the front bevel at the low 8–10 degree angle on a routine schedule, and perform ura-dashi/ura-oshi maintenance on the back as needed rather than on a fixed timetable.
- Store in a saya or dedicated slot away from humidity, and check periodically for early signs of pitting if you live in a humid climate.
Notice how much more frequent and technique-dependent the Usuba routine is. This isn’t meant to scare you off — plenty of home cooks do take on an Usuba and love it — but it’s an honest picture of the ongoing time commitment involved, which is exactly the kind of practical detail that’s often missing from shorter buying guides.
24. Real-World Buyer Personas
To help you place yourself in this comparison, here are a few common buyer profiles and which knife tends to fit best.
The Weeknight Home Cook
Cooks 4–5 nights a week, mostly stir-fries, salads, and roasted vegetables. Wants something that goes from drawer to cutting board with zero fuss. Best fit: a stainless VG-10 Nakiri. The low-maintenance steel and forgiving double bevel match the low-friction lifestyle this cook wants from their tools.
The Serious Home Cook / Knife Hobbyist
Enjoys the ritual of whetstone sharpening, follows Japanese cooking techniques online, and wants to expand their skill set. Best fit: start with a mid-range carbon-clad Nakiri, then consider an entry-level Usuba once comfortable with basic whetstone maintenance. This cook has the patience for the Usuba’s learning curve as a deliberate hobby project.
The Culinary Student
Training formally in Japanese cuisine or working toward a career in a Kaiseki or sushi-focused kitchen. Best fit: both, eventually — a Nakiri for daily volume prep during training, and a proper single-bevel Usuba as part of building out a professional knife roll, ideally under direct instruction from an instructor or senior chef.
The Professional Chef
Already working in a Japanese kitchen and needs tools that match professional expectations. Best fit: a hand-forged Blue Steel or White Steel Usuba from an established Sakai or Seki maker, sized and shaped (Kanto or Kansai style) to match personal technique preferences developed over years of training.
25. The Three Knives of a Professional Japanese Kitchen
To fully place the Usuba in context, it helps to understand the traditional trio of knives found in most professional Japanese kitchens, sometimes called the Kanto sanpo or “three swords” of Japanese cutlery. Understanding this trio also explains why an Usuba is never really meant to be a do-everything knife the way a Nakiri is.
Deba: The Butchery Knife
The Deba is a thick, heavy, single-bevel knife designed for breaking down whole fish — filleting, removing heads, and cutting through small bones. It bears no resemblance to a Nakiri or Usuba in shape, but it shares the same single-bevel philosophy: extreme sharpness concentrated on one face for maximum control during precise, repetitive butchery tasks. If you’re building out a full Japanese knife set, our boning knife vs fillet knife guide covers the Western equivalent of this role.
Yanagiba: The Slicer
The Yanagiba is a long, narrow, single-bevel slicing knife used almost exclusively for sashimi and sushi work. Its extreme length and thin profile allow a sushi chef to draw the blade through raw fish in a single pull-stroke, avoiding the sawing motion that would tear delicate flesh and ruin presentation.
Usuba: The Vegetable Specialist
The Usuba rounds out the trio, handling everything related to vegetable preparation, garnish work, and decorative cutting — the domain we’ve covered throughout this guide. Together, the Deba, Yanagiba, and Usuba represent a complete professional toolkit, each one uncompromisingly specialized rather than a generalist blade.
The Nakiri, notably, isn’t part of this professional trio at all. It exists in a parallel track built for accessibility rather than specialization — which is exactly why it thrives in home kitchens where a single do-it-all vegetable knife makes far more sense than three specialized single-bevel blades.
26. Transitioning from a Western Chef’s Knife: What to Expect
If your current knife roll only contains Western-style blades, here’s what to actually expect when picking up a Nakiri or Usuba for the first time.
Coming from a Chef’s Knife to a Nakiri
This transition is usually painless. The double-bevel edge behaves almost identically to a Western knife in terms of feel and technique — the main adjustment is the flat cutting edge (versus a curved Western profile), which means you’ll use more of a straight chopping motion and less of a rocking motion. Most cooks adapt within a single prep session.
Coming from a Chef’s Knife to an Usuba
This transition is considerably harder and shouldn’t be rushed. Expect your first several attempts to produce uneven, wedge-shaped cuts as the blade steers away from your intended cutting line. Professional culinary students typically spend weeks practicing basic straight cuts before attempting anything as advanced as Katsuramuki. If you’re set on learning, start with soft, forgiving vegetables like cucumber before moving to denser produce like daikon or carrot.
A Practical Recommendation
If you’re on the fence, buy the Nakiri first. It will immediately improve your vegetable prep with almost no learning curve. Only invest in an Usuba once you’ve confirmed — through actual kitchen experience — that you want to develop the specific skill of single-bevel cutting and decorative technique. Buying an expensive Usuba before you’re ready to maintain and use it properly is one of the most common regret-purchases in the Japanese knife hobby.
Frequently Asked Questions (FAQ)
The back side (Urasuki) is slightly concave. This creates an air pocket that prevents food from sticking and allows for a smoother glide. It also makes sharpening the back (flat) side faster because you only contact the rim of the blade.
Only if it is a left-handed Usuba. Because they are asymmetrical, a standard right-handed Usuba will not work for a lefty. Nakiris, being double-bevel, are ambidextrous.
Yes. The Usuba is heavier and steers during the cut. The Nakiri cuts straight and is much lighter, making it safer for casual cooks. See Santoku vs Nakiri for another safe alternative.
No. Although they share a similar rectangular silhouette and are both classified as Japanese vegetable knives, they are ground completely differently. The Nakiri is double-beveled and symmetrical, while the Usuba is single-beveled with a flat or concave back. Some retailers sell double-bevel knives labeled as “Usuba-style,” which can cause confusion, but a true Usuba is always single-bevel.
For low-maintenance home use, VG-10 stainless is an excellent choice for a Nakiri. For traditional performance and the sharpest possible edge, White Steel or Blue Steel are preferred, especially on an Usuba, though both require diligent drying and occasional patina management to avoid rust.
You can attempt it, but expect a learning curve. Katsuramuki relies on a stable, low sharpening angle and careful grip control that most beginners haven’t developed. Many culinary students practice for months using a Nakiri or even a paring knife before transitioning to an Usuba for this technique.
Most home cooks do not. A single Nakiri covers the vast majority of vegetable prep needs. Professional kitchens, particularly those preparing Kaiseki-style cuisine, often keep both — the Nakiri for volume prep and the Usuba for decorative and precision work.
Check the product description for explicit mention of a single bevel, chisel grind, or Urasuki (hollow-ground back). Authentic Usubas are also typically sold with a Wa-handle and are almost never available under $100 from a reputable Japanese maker.
27. The Craftsmanship Behind Sakai and Seki Blacksmiths
Part of what drives the price gap between a mass-produced Nakiri and a hand-forged Usuba is the production process itself, and it’s worth understanding if you’re weighing a premium purchase.
Sakai, near Osaka, has been a center of Japanese blade production since the 16th century, originally rising to prominence for tobacco-cutting knives before shifting toward culinary blades. Traditional Sakai production divides labor across specialists: one craftsman forges the blade, another sharpens and finishes the edge, and a third fits the handle — a division of labor that has remained largely unchanged for generations. Seki, in Gifu Prefecture, developed a parallel reputation historically rooted in samurai sword-making, later transitioning much of that swordsmithing expertise into kitchen cutlery as demand for swords declined.
A factory-produced Nakiri, by contrast, is usually stamped from a single sheet of steel and ground by machine, which is exactly why it can be sold at a fraction of the cost of a hand-forged blade. This isn’t a knock on factory Nakiris — the quality-to-price ratio on a machine-made Tojiro or Shun is genuinely excellent — but it does explain why an artisan Usuba from a named Sakai blacksmith can run several times the price of even a very good Nakiri: you are paying for hand labor across multiple specialized craftsmen rather than an automated production line.
28. Common Mistakes to Avoid
After covering the technical details, it’s worth closing with the practical mistakes we see buyers make most often with these two knife types.
- Buying an Usuba before you’re ready to maintain it: The single biggest regret purchase in this category. If you’re not already comfortable with basic whetstone sharpening, start with a Nakiri.
- Assuming “Usuba-style” means single-bevel: Many budget knives use this marketing language while actually being double-beveled. Always confirm the bevel type before purchasing if authenticity matters to you.
- Sharpening an Usuba like a Western knife: Applying even, symmetrical strokes to both sides of a single-bevel blade will destroy its geometry. The back requires an entirely different maintenance approach (ura-dashi/ura-oshi) than the front.
- Letting carbon steel sit wet: Even a few minutes of standing water on a White or Blue Steel blade can cause visible spotting. Dry immediately, every time, with no exceptions.
- Ignoring handedness: Left-handed cooks who buy a standard right-handed Usuba without realizing the mismatch often blame themselves for poor technique, when the real issue is that the blade is ground for the opposite hand.
- Using the wrong cutting board: Glass, stone, or extremely hard bamboo boards will dull both knives quickly and can chip the thin, acute edge of an Usuba in particular. A softer end-grain wood or quality plastic board is strongly preferred.
Conclusion: The Verdict
The Nakiri vs. Usuba choice is not about which is “better”—it is about your skill level.
Choose the Nakiri If: You are a home cook or a professional doing volume prep. You want a knife that is easy to sharpen, cuts straight, and flies through vegetables. It is the practical choice.
Choose the Usuba If: You are a sushi chef or a culinary student specializing in Japanese cuisine. You need to perform Katsuramuki or decorative cuts, and you are willing to learn the art of single-bevel sharpening.
For 99% of people reading this, the Nakiri is the winner. Check out our affordable knife guide to find a Nakiri that fits your budget!
















Pingback: Bunka Knife vs. Santoku: Which is Right for You?